Quantcast
Channel: Planet GStreamer
Viewing all 1078 articles
Browse latest View live

Jean-François Fortin Tam: Rebuild of EvanGTGelion: Getting Things GNOME 0.4 released!

$
0
0

We are very proud to be announcing today the 0.4 release of Getting Things GNOME (“GTG”), codenamed “You Are (Not) Done”. This much-awaited release is a major overhaul that brings together many updates and enhancements, including new features, a modernized user interface and updated underlying technology.

Screenshot
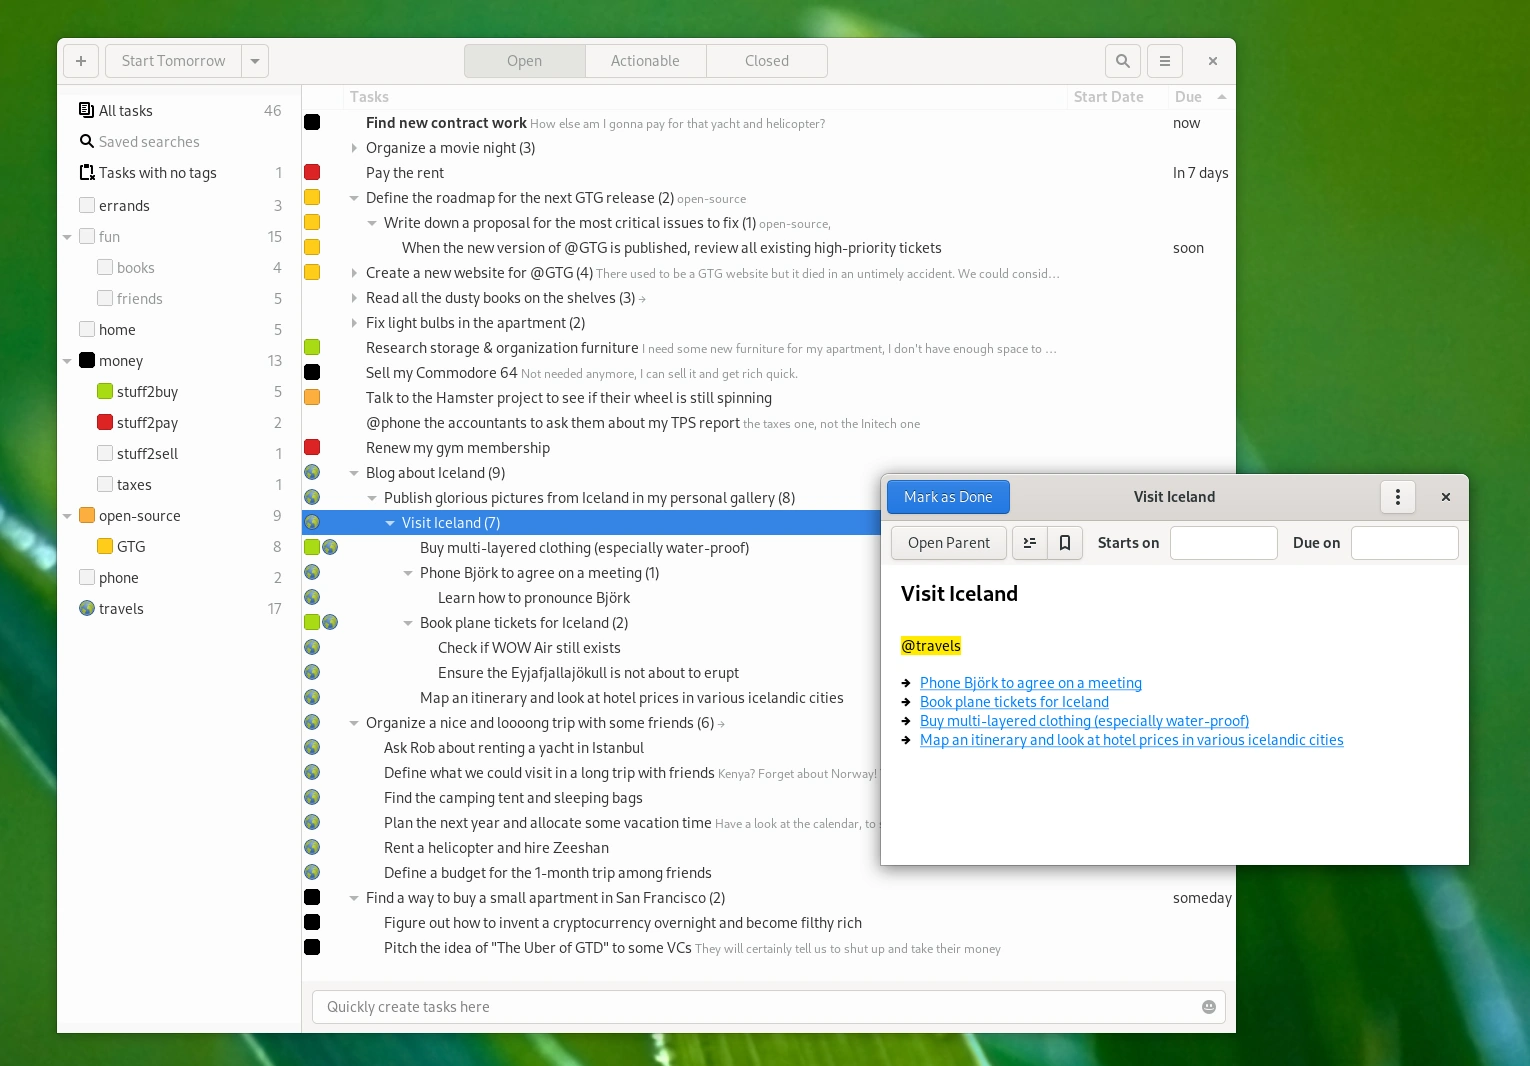
Screenshot of GTG 0.4

Beyond what is featured in these summarized release notes below, GTG itself has undergone over 630 changes affecting over 500 files, and received hundreds of bug fixes, as can be seen on here and here.

We are thankful to all of our supporters and contributors, past and present, who made GTG 0.4 possible. Check out the “About” dialog for a list of contributors for this release.

A summary of GTG’s development history and a high-level explanation of its renaissance can be seen in this teaser video:

A demonstration video provides a tour of GTG’s current features:

A few words about the significance of this release

As a result of the new lean & agile project direction and contributor workflow we have formalized, this release—the first in over 6.5 years—constitutes a significant milestone in the revival of this community-driven project.

This milestone represents a very significant opportunity to breathe new life into the project, which is why I made sure to completely overhaul the “contributor experience”, clarifying and simplifying the process for new contributors to make an impact.

I would highly encourage everybody to participate towards the next release. You can contribute all sorts of improvements to this project, be it bug fixes or new features, adopting one of the previous plugins, doing translation and localization work, working on documentation, or spreading the word. Your involvement is what makes this project a success.

— Jeff (yours truly)

“When I switched from Linux to macOS a few years ago, I never found a todo app that was as good as GTG, so I started to try every new shiny (and expensive) thing. I used Evernote, Todoist, Things and many others. Nothing came close. I spent the next 6 years trying every new productivity gadget in order to find the perfect combo.
In 2019, Jeff decided to take over GTG and bring it back from the grave. It’s a strange feeling to see your own creation continuing in the hands of others. Living to see your software being developed by others is quite an accomplishment. Jeff’s dedication demonstrated that, with GTG, we created a tool which can become an essential part of chaos warrior’s productivity system. A tool which is useful without being trendy, even years after it was designed. A tool that people still want to use. A tool that they can adapt and modernise. This is something incredible that can only happen with Open Source.”

— Lionel Dricot, original author of GTG (quote edited with permission)

It has been over seven years since the 0.3rd impact. This might very well be the Fourth Impact. Shinji, get in the f%?%$ing build bot!

— Gendo Ikari

Release notes

Technology Upgrades

GTG and libLarch have been fully ported to Python 3, GTK 3, and GObject introspection (PyGI).

User Interface and Frontend Improvements

General UI overhaul

The user interface has been updated to follow the current GNOME Human Interface Guidelines (HIG), style (see GH GTG PR #219 and GH GTG PR #235 for context) and design patterns:

  • Client-side window decorations using the GTK HeaderBar widget. Along with the removal of the menu bars, this saves a significant amount of space and allows for more content to be displayed on screen.
  • The Preferences dialog was redesigned, and its contents cleaned up to remove obsolete settings (see GH GTG PR #227).
  • All windows are properly parented (set as transient) with the main window, so that they can be handled better by window managers.
  • Symbolic icons are available throughout the UI.
  • Improvements to padding and borders are visible throughout the application.

Main window (“Task Browser”)

  • The menu bar has been replaced by a menu button. Non-contextual actions (for example: toggle Sidebar, Plugins, Preferences, Help, and About) have been moved to the main menu button.
  • Searching is now handled through a dedicated Search Bar that can be toggled on and off with the mouse, or the Ctrl+F keyboard shortcut.
  • The “Workview” mode has been renamed to the “Actionable” view. “Open”, “Actionable”, and “Closed” tasks view modes are available (see GH GTG PR #235).
  • An issue with sorting tasks by title in the Task Browser has been fixed: sorting is no longer case-sensitive, and now ignores tag marker characters (GH GTG issue #375).
  • Start/Due/Closed task dates now display as properly translated in the Task Browser (GH GTG issue #357)
  • In the Task Browser’s right-click context menus, more start/due dates choices are available, including common upcoming dates and a custom date picker (GH GTG issue #244).

Task Editor

  • The Calendar date picker pop-up widgets have been improved (see GH GTG PR #230).
  • The Task Editor now attempts to place newly created windows in a more logical way (GH GTG issue #287).
  • The title (first line of a task) has been changed to a neutral black header style, so that it doesn’t look like a hyperlink.

New Features

  • You can now open (or create) a task’s parent task (GH GTG issue #138).
  • You can now select multiple closed tasks and perform bulk actions on them (GH GTG issue #344).
  • It is now possible to rename or delete tags by right-clicking on them in the Task Browser.
  • You can automatically generate and assign tag colors. (LP GTG issue #644993)
  • The Quick Add entry now supports emojis 🤩
  • The Task Editor now provides a searchable “tag picker” widget.
  • The “Task Reaper” allows deleting old closed tasks for increased performance. Previously available as a plugin, it is now a built-in feature available in the Preferences dialog (GH GTG issue #222).
  • The Quick Deferral (previously, the “Do it Tomorrow” plugin) is now a built-in feature. It is now possible to defer multiple tasks at once to common upcoming days or to a custom date (GH GTG issue #244).
  • In the unlikely case where GTG might encounter a problem opening your data file, it will automatically attempt recovery from a previous backup snapshot and let you know about it (LP GTG issue #971651)

Backend and Code Quality improvements

  • Updates were made to overall code quality (GH GTG issue #237) to reduce barriers to contribution:
    • The code has been ported to use GtkApplication, resulting in simpler and more robust UI code overall.
    • GtkBuilder/Glade “.ui” files have been regrouped into one location.
    • Reorganization of various .py files for consistency.
    • The debugging/logging system has been simplified.
    • Various improvements to the test suite.
    • The codebase is mostly PEP8-compliant. We have also relaxed the PEP8 max line length convention to 100 characters for readability, because this is not the nineties anymore.
  • Support is available for Tox, for testing automation within virtualenvs (see GH GTG PR #239).
  • The application’s translatable strings have been reviewed and harmonized, to ensure the entire application is translatable (see GH GTG PR #346).
  • Application CSS has been moved to its own file (see GH GTG PR #229).
  • Outdated plugins and synchronization services have been removed (GH GTG issue #222).
  • GTG now provides an “AppData” (FreeDesktop AppStream metadata) file to properly present itself in distro-agnostic software-centers.
  • The Meson build system is now supported (see GH GTG PR #315).
    • The development version’s launch script now allows running the application with various languages/locales, using the LANG environment variable for example.
    • Appdata and desktop files are named based on the chosen Meson profile (see GH GTG PR #349).
    • Depending on the Meson profile, the HeaderBar style changes dynamically to indicate when the app is run in a dev environment, such as GNOME Builder (GH GTG issue #341).

Documentation Updates

  • The user manual has been rewritten, reorganized, and updated with new images (GH GTG issue #243). It is also now available as an online publication.
  • The contributor documentation has been rewritten to make it easier for developers to get involved and to clarify project contribution guidelines  (GH GTG issue #200). Namely, updates were made to the README.md file to clarify the set-up process for the development version, as well as numerous new guides and documentation for contributors in the docs/contributors/ folder.

Infrastructure and other notable updates

  • The entire GTG GNOME wiki site has been updated (GH GTG issue #200), broken links have been fixed, references to the old website have been removed.
  • We have migrated from LaunchPad to GitHub (and eventually GitLab), so references to LaunchPad have been removed.
  • We now have social media accounts on Mastodon and Twitter (GH GTG issue #294).
  • Flatpak packages on Flathub are going to be our official direct upstream-to-user software distribution mechanism (GH GTG issue #233).

Notice

In order to bring this release out of the door, some plugins have been disabled and are awaiting adoption by new contributors to test and maintain them. Please contribute to maintain your favorite plugin. Likewise, we had to remove the DBus module (and would welcome help to bring it back into a better shape, for those who want to control the app via DBus).


Getting and installing GTG 0.4

We hope to have our flatpak package ready in time for this announcement, or shortly afterwards. See the install page for details.


Spreading this announcement

We have made some social postings on Twitter, on Mastodon and on LinkedIn that you can re-share/retweet/boost. Please feel free to link to this announcement on forums and blogs as well!

The post Rebuild of EvanGTGelion: Getting Things GNOME 0.4 released! appeared first on The Open Sourcerer.


Víctor Jáquez: New VA-API H.264 decoder in gst-plugins-bad

$
0
0

Recently, a new H.264 decoder, using VA-API, was merged in gst-plugins-bad.

Why another VA-based H.264 decoder if there is already gstreamer-vaapi?

As usual, an historical perspective may give some clues.

It started when Seungha Yang implemented the GStreamer decoders for Windows using DXVA2 and D3D11 APIs.

Perhaps we need one step back and explain what are stateless decoders.

Video decoders are magic and opaque boxes where we push encoded frames, and later we’ll pop full decoded frames in raw format. This is how OpenMAX and V4L2 decoders work, for example.

Internally we can imagine those magic and opaque boxes has two main operations:

  • Codec state handling
  • Signal processing like Fourier-related transformations (such as DCT), entropy coding, etc. (DSP, in general)

The codec state handling basically extracts, from the stream, the frame’s parameters and its compressed data, so the DSP algorithms can decode the frames. Codec state handling can be done with generic CPUs, while DSP algorithms are massively improved through specific purpose processors.

These video decoders are known as stateful decoders, and usually they are distributed through binary and closed blobs.

Soon, silicon vendors realized they can offload the burden of state handling to third-party user-space libraries, releasing what it is known as stateless decoders. With them, your code not only has to push frames into the opaque box, but now it shall handle the codec specifics to provide all the parameters and references for each frame. VAAPI and DXVA2 are examples of those stateless decoders.

Returning to Seungha’s implementation, in order to get theirs DXVA2/D3D11 decoders, they also needed a state handler library for each codec. And Seungha wrote that library!

Initially they wanted to reuse the state handling in gstreamer-vaapi, which works pretty good, but its internal library, from the GStreamer perspective, is over-engineered: it is impossible to rip out only the state handling without importing all its data types. Which is kind of sad.

Later, Nicolas Dufresne, realized that this library can be re-used by other GStreamer plugins, because more stateless decoders are now available, particularly V4L2 stateless, in which he is interested. Nicolas moved Seungha’s code into a library in gst-plugins-bad.

Currently, libgstcodecs provides state handling of H.264, H.265, VP8 and VP9.

Let’s return to our original question: Why another VA-based H.264 decoder if there is already one in gstreamer-vaapi?

The quick answer is «to pay my technical debt».

As we already mentioned, gstreamer-vaapi is big and over-engineered, though we have being simplifying the internal libraries, in particular He Junyan, has done a lot of work replacing the internal base class, GstVaapiObject, withGstObject or GstMiniObject. Also, this kind of projects, where there’s a lot of untouched code, it carries a lot of cargo cult decisions.

So I took the libgstcodecs opportunity to write a simple, thin and lean, H.264 decoder, using VA new API calls (vaExportSurfaceHandle(), for example) and learning from other implementations, such as FFMpeg and ChromeOS. This exercise allowed me to identify where are the dusty spots in gstreamer-vaapi and how they should be fixed (and we have been doing it since then!).

Also, this opportunity lead me to learn a bit more about the H.264 specification since I implemented the reference picture list handling, and fixed a small bug in Chromium.

Now, let me be crystal clear: GStreamer VA-API is not going anywhere. It is, right now, one of the most feature-complete implementations using VA-API, even with its integration issues, and we are working on them, particularly, Intel folks are working hard on a new AV1 decoder, enhancing encoders and adding new video post-processing features.

But, this new vah264dec is an experimental VA-API decoder, which aims towards a tight integration with GStreamer, oriented to provide a good experience in most of the common use cases and to enhance the common libgstcodecs library shared with other stateless decoders, looking to avoid Intel specific nuances.

These are the main characteristics and plans of this new decoder:

  • It use, by default, a DRM connection to VA display, avoiding the troubles of choosing X11 or Wayland.
    • It uses the first found DRM device as VA display
    • In the future, users will be able to provide their custom VA display through the pipeline’s context.
  • It requires libva >= 1.6
  • No multiview/stereo profiles, neither interlaced streams, because libgstcodecs doesn’t handle them yet
  • It is incompatible with gstreamer-vaapi: mixing elements might lead to problems.
  • Even if memory:VAMemory is exposed, it is not handled yet by any other element yet.
    • Users will get VASurfaces via mapping as GstGL does with textures.
  • Caps templates are generated dynamically generated by querying VAAPI
  • YV12 and I420 are added for system memory caps because they seem to be supported for all the drivers when downloading frames onto main memory, as they are used by xvimagesink and others, avoiding color conversion.
  • Decoding surfaces aren’t bounded to context, so they can grow beyond the DBP size, allowing smooth reverse playback.
  • There isn’t yet error handling and recovery.
  • The element is supposed to spawn if different renderD nodes with VA-API driver support are found (like gstv4l2), but it hasn’t been tested yet.

Now you may be asking how do I use vah264dec?

Currently vah264dec has NONE rank, which means that it will never be autoplugged, but you can use the trick of the environment variable GST_PLUGIN_FEATURE_RANK:

$ GST_PLUGIN_FEATURE_RANK=vah264dec:259 gst-play-1.0 ~/video.mp4

And that’s it!

Thanks.

Sebastian Dröge: Live loudness normalization in GStreamer & experiences with porting a C audio filter to Rust

$
0
0

A few months ago I wrote a new GStreamer plugin: an audio filter for live loudness normalization and automatic gain control.

The plugin can be found as part of the GStreamer Rust plugin in the audiofx plugin. It’s also included in the recent 0.6.0 release of the GStreamer Rust plugins and available from crates.io.

Its code is based on Kyle Swanson’s great FFmpeg filter af_loudnorm, about which he wrote some more technical details on his blog a few years back. I’m not going to repeat all that here, if you’re interested in those details and further links please read Kyle’s blog post.

From a very high-level, the filter works by measuring the loudness of the input following the EBU R128 standard with a 3s lookahead, adjusts the gain to reach the target loudness and then applies a true peak limiter with 10ms to prevent any too high peaks to get passed through. Both the target loudness and the maximum peak can be configured via the loudness-target and max-true-peak properties, same as in the FFmpeg filter. Different to the FFmpeg filter I only implemented the “live” mode and not the two-pass mode that is implemented in FFmpeg, which first measures the loudness of the whole stream and then in a second pass adjusts it.

Below I’ll describe the usage of the filter in GStreamer a bit and also some information about the development process, and the porting of the C code to Rust.

Usage

For using the filter you most likely first need to compile it yourself, unless you’re lucky enough that e.g. your Linux distribution includes it already.

Compiling it requires a Rust toolchain and GStreamer 1.8 or newer. The former you can get via rustup for example, if you don’t have it yet, the latter either from your Linux distribution or by using the macOS, Windows, etc binaries that are provided by the GStreamer project. Once that is done, compiling is mostly a matter of running cargo build in the audio/audiofx directory and copying the resulting libgstrsaudiofx.so (or .dll or .dylib) into one of the GStreamer plugin directories, for example ~/.local/share/gstreamer-1.0/plugins.

After that boring part is done, you can use it for example as follows to run loudness normalization on the Sintel trailer:

gst-launch-1.0 playbin \
    uri=https://www.freedesktop.org/software/gstreamer-sdk/data/media/sintel_trailer-480p.webm \
    audio-filter="audioresample ! rsaudioloudnorm ! audioresample ! capsfilter caps=audio/x-raw,rate=48000"

As can be seen above, it is necessary to put audioresample elements around the filter. The reason for that is that the filter currently only works on 192kHz input. This is a simplification for now to make it easier inside the filter to detect true peaks. You would first upsample your audio to 192kHz and then, if needed, later downsample it again to your target sample rate (48kHz in the example above). See the link mentioned before for details about true peaks and why this is generally a good idea to do. In the future the resampling could be implemented internally and maybe optionally the filter could also work with “normal” peak detection on the non-upsampled input.

Apart from that caveat the filter element works like any other GStreamer audio filter and can be placed accordingly in any GStreamer pipeline.

If you run into any problems using the code or it doesn’t work well for your use-case, please create an issue in the GStreamer bugtracker.

The process

As I wrote above, the GStreamer plugin is part of the GStreamerRust plugins so the first step was to port the FFmpeg C code to Rust. I expected that to be the biggest part of the work, but as writing Rust is simply so much more enjoyable than writing C and I would have to adjust big parts of the code to fit the GStreamer infrastructure anyway, I took this approach nonetheless. The alternative of working based on the C code and writing the plugin in C didn’t seem very appealing to me. In the end, as usual when developing in Rust, this also allowed me to be more confident about the robustness of the result and probably reduced the amount of time spent debugging. Surprisingly, the translation was actually not the biggest part of the work, but instead I had to debug a couple of issues that were already present in the original FFmpeg code and find solutions for them. But more on that later.

The first step for porting the code was to get an implementation of the EBU R128 loudness analysis. In FFmpeg they’re using a fork of the libebur128 C library. I checked if there was anything similar for Rust already, maybe even a pure-Rust implementation of it, but couldn’t find anything. As I didn’t want to write one myself or port the code of the libebur128 C library to Rust, I wrote safe Rust bindings for that library instead. The end result of that can be found on crates.io as an independent crate, in case someone else also needs it for other purposes at some point. The crate also includes the code of the C library, making it as easy as possible to build and include into other projects.

The next step was to actually port the FFmpeg C code to Rust. In the end that was a rather straightforward translation fortunately. The latest version of that code can be found here.

The biggest difference to the C code is the usage of Rust iterators and iterator combinators like zip and chunks_exact. In my opinion this makes the code quite a bit easier to read compared to the manual iteration in the C code together with array indexing, and as a side effect it should also make the code run faster in Rust as it allows to get rid of a lot of array bounds checks.

Apart from that, one part that was a bit inconvenient during that translation and still required manual array indexing is the usage of ringbuffers everywhere in the code. For now I wrote those like I would in C and used a few unsafe operations like get_unchecked to avoid redundant bounds checks, but at a later time I might refactor this into a proper ringbuffer abstraction for such audio processing use-cases. It’s not going to be the last time I need such a data structure. A short search on crates.io gave various results for ringbuffers but none of them seem to provide an API that fits the use-case here. Once that’s abstracted away into a nice data structure, I believe the Rust code of this filter is really nice to read and follow.

Now to the less pleasant parts, and also a small warning to all the people asking for Rust rewrites of everything: of course I introduced a couple of new bugs while translating the code although this was a rather straightforward translation and I tried to be very careful. I’m sure there is also still a bug or two left that I didn’t find while debugging. So always keep in mind that rewriting a project will also involve adding new bugs that didn’t exist in the original code. Or maybe you’re just a better programmer than me and don’t make such mistakes.

Debugging these issues that showed up while testing the code was a good opportunity to also add extensive code comments everywhere so I don’t have to remind myself every time again what this block of code is doing exactly, and it’s something I was missing a bit from the FFmpeg code (it doesn’t have a single comment currently). While writing those comments and explaining the code to myself, I found the majority of these bugs that I introduced and as a side-effect I now have documentation for my future self or other readers of the code.

Fixing these issues I introduced myself wasn’t that time-consuming neither in the end fortunately, but while writing those code comments and also while doing more testing on various audio streams, I found a couple of bugs that already existed in the original FFmpeg C code. Further testing also showed that they caused quite audible distortions on various test streams. These are the bugs that unfortunately took most of the time in the whole process, but at least to my knowledge there are no known bugs left in the code now.

For these bugs in the FFmpeg code I also provided a fix that is merged already, and reported the othertwo in their bug tracker.

The first one I’d be happy to provide a fix for if my approach is considered correct, but the second one I’ll leave for someone else. Porting over my Rust solution for that one will take some time and getting all the array indexing involved correct in C would require some serious focusing, for which I currently don’t have the time.

Or maybe my solutions to these problems are actually wrong, or my understanding of the original code was wrong and I actually introduced them in my translation, which also would be useful to know.

Overall, while porting the C code to Rust introduced a few new problems that had to be fixed, I would definitely do this again for similar projects in the future. It’s more fun to write and in my opinion the resulting code is easier readable, and better to maintain and extend.

Jan Schmidt: OpenHMD and the Oculus Rift

$
0
0

For some time now, I’ve been involved in the OpenHMD project, working on building an open driver for the Oculus Rift CV1, and more recently the newer Rift S VR headsets.

This post is a bit of an overview of how the 2 devices work from a high level for people who might have used them or seen them, but not know much about the implementation. I also want to talk about OpenHMD and how it fits into the evolving Linux VR/AR API stack.

OpenHMD

http://www.openhmd.net/

In short, OpenHMD is a project providing open drivers for various VR headsets through a single simple API. I don’t know of any other project that provides support for as many different headsets as OpenHMD, so it’s the logical place to contribute for largest effect.

OpenHMD is supported as a backend in Monado, and in SteamVR via the SteamVR-OpenHMD plugin. Working drivers in OpenHMD opens up a range of VR games – as well as non-gaming applications like Blender. I think it’s important that Linux and friends not get left behind – in what is basically a Windows-only activity right now.

One downside is that does come with the usual disadvantages of an abstraction API, in that it doesn’t fully expose the varied capabilities of each device, but instead the common denominator. I hope we can fix that in time by extending the OpenHMD API, without losing its simplicity.

Oculus Rift S

I bought an Oculus Rift S in April, to supplement my original consumer Oculus Rift (the CV1) from 2017. At that point, the only way to use it was in Windows via the official Oculus driver as there was no open source driver yet. Since then, I’ve largely reverse engineered the USB protocol for it, and have implemented a basic driver that’s upstream in OpenHMD now.

I find the Rift S a somewhat interesting device. It’s not entirely an upgrade over the older CV1. The build quality, and some of the specifications are actually worse than the original device – but one area that it is a clear improvement is in the tracking system.

CV1 Tracking

The Rift CV1 uses what is called an outside-in tracking system, which has 2 major components. The first is input from Inertial Measurement Units (IMU) on each device – the headset and the 2 hand controllers. The 2nd component is infrared cameras (Rift Sensors) that you space around the room and then run a calibration procedure that lets the driver software calculate their positions relative to the play area.

IMUs provide readings of linear acceleration and angular velocity, which can be used to determine the orientation of a device, but don’t provide absolute position information. You can derive relative motion from a starting point using an IMU, but only over a short time frame as the integration of the readings is quite noisy.

This is where the Rift Sensors get involved. The cameras observe constellations of infrared LEDs on the headset and hand controllers, and use those in concert with the IMU readings to position the devices within the playing space – so that as you move, the virtual world accurately reflects your movements. The cameras and LEDs synchronise to a radio pulse from the headset, and the camera exposure time is kept very short. That means the picture from the camera is completely black, except for very bright IR sources. Hopefully that means only the LEDs are visible, although light bulbs and open windows can inject noise and make the tracking harder.

Rift Sensor view of the CV1 headset and 2 controllers.Rift Sensor view of the CV1 headset and 2 controllers.

If you have both IMU and camera data, you can build what we call a 6 Degree of Freedom (6DOF) driver. With only IMUs, a driver is limited to providing 3 DOF – allowing you to stand in one place and look around, but not to move.

OpenHMD provides a 3DOF driver for the CV1 at this point, with experimental 6DOF work in a branch in my fork. Getting to a working 6DOF driver is a real challenge. The official drivers from Oculus still receive regular updates to tweak the tracking algorithms.

I have given several presentations about the progress on implementing positional tracking for the CV1. Most recently at Linux.conf.au 2020 in January. There’s a recording at https://www.youtube.com/watch?v=PTHE-cdWN_s if you’re interested, and I plan to talk more about that in a future post.

Rift S Tracking

The Rift S uses Inside Out tracking, which inverts the tracking process by putting the cameras on the headset instead of around the room. With the cameras in fixed positions on the headset, the cameras and their view of the world moves as the user’s head moves. For the Rift S, there are 5 individual cameras pointing outward in different directions to provide (overall) a very wide-angle view of the surroundings.

The role of the tracking algorithm in the driver in this scenario is to use the cameras to look for visual landmarks in the play area, and to combine that information with the IMU readings to find the position of the headset. This is called Visual Inertial Odometry.

There is then a 2nd part to the tracking – finding the position of the hand controllers. This part works the same as on the CV1 – looking for constellations of LED lights on the controllers and matching what you see to a model of the controllers.

This is where I think the tracking gets particularly interesting. The requirements for finding where the headset is in the room, and the goal of finding the controllers require 2 different types of camera view!

To find the landmarks in the room, the vision algorithm needs to be able to see everything clearly and you want a balanced exposure from the cameras. To identify the controllers, you want a very fast exposure synchronised with the bright flashes from the hand controller LEDs – the same as when doing CV1 tracking.

The Rift S satisfies both requirements by capturing alternating video frames with fast and normal exposures. Each time, it captures the 5 cameras simultaneously and stitches them together into 1 video frame to deliver over USB to the host computer. The driver then needs to split each frame according to whether it is a normal or fast exposure and dispatch it to the appropriate part of the tracking algorithm.

Rift S – normal room exposure for Visual Inertial Odometry. Rift S – fast exposure with IR LEDs for controller tracking.

There are a bunch of interesting things to notice in these camera captures:

  • Each camera view is inserted into the frame in some native orientation, and requires external information to make use of the information in them
  • The cameras have a lot of fisheye distortion that will need correcting.
  • In the fast exposure frame, the light bulbs on my ceiling are hard to tell apart from the hand controller LEDs – another challenge for the computer vision algorithm.
  • The cameras are Infrared only, which is why the Rift S passthrough view (if you’ve ever seen it) is in grey-scale.
  • The top 16-pixels of each frame contain some binary data to help with frame identification. I don’t know how to interpret the contents of that data yet.

Status

This blog post is already too long, so I’ll stop here. In part 2, I’ll talk more about deciphering the Rift S protocol.

Thanks for reading! If you have any questions, hit me up at mailto:thaytan@noraisin.net or @thaytan on Twitter

Seungha Yang: Bringing Microsoft Media Foundation to GStreamer

$
0
0

The Microsoft Media Foundation plugin has finally landed as part of GStreamer 1.17!

Currently it supports the following features:

  • Video capture from webcam (and UWP support)
  • H.264/HEVC/VP9 video encoding
  • AAC/MP3 audio encoding

NOTE : Strictly speaking, the UWP video capture implementation is not part of the Media Foundation API. The internal implementation is based on the Windows.Media.Capture API.
Due to the structural similarity between Media Foundation and WinRT Media API however, it makes sense to include the UWP video capture implementation in this plugin.

Media Foundation is known as the successor of DirectShow.

As DirectShow does, Media Foundation provides various media-related functionality, but most of the features (muxing, demuxing, capturing, rendering, decoding/encoding and pipelining of relevant processing functionality) of Media Foundation can be replaced with GStreamer.

Then why do we need Media Foundation on Windows? Isn’t GStreamer enough?

Why do we need Media Foundation then?

When it comes to software implementation, there might be several alternatives such as the well-known x264 software encoder, but what’s the situation with hardware implementations?

A very important point here is that hardware vendors such as Intel, Nvidia, AMD and Qualcomm are abstracting their hardware video encoding API via Media Foundation. Therefore, device-agnostic, hardware-accelerated media processing can be achieved using Media Foundation (more specifically, as a Media Foundation Transform API) without any external library dependencies.

Moreover, MFT (Media Foundation Transform) encoders can be used in UWP applications (but some codecs might be blacklisted by OS in this case).

Well, then what would be difference between the well-known MSDK (Intel Media SDK), NVCODEC (Nvidia Codec SDK) and Media Foundation implementations?

From my perspective, a Media Foundation implementation could be as powerful as the vendor specific APIs, because Media Foundation uses vendor implementations underneath (e.g., libmfxhw64.dll for Intel and nvEncodeAPI64.dll for NVidia). That’s not the case for the moment though — there is some overhead/limitations from GStreamer’s Media Foundation API integration.

To make Media Foundation plugin as performant as the vendor specific APIs, there is some remaining work to be done. For example Direct3D support in the Media Foundation plugin is one such potential improvement.

Media Foundation plugin details

The gst-inspect-1.0 example below summarizes the list of elements belonging to the Media Foundation plugin. Similar to the GStreamer D3D11 plugin, the Media Foundation plugin will enumerate available encoder MFT first, and then will register each MFT separately. You might therefore see a different list of elements on your system (or their description might be different).

[gst-master] PS C:\Work\gst-build> gst-inspect-1.0.exe mediafoundation
Plugin Details:
Name mediafoundation
Description Microsoft Media Foundation plugin
Filename C:\Work\GST-BU~1\build\SUBPRO~1\GST-PL~3\sys\MEDIAF~1\gstmediafoundation.dll
Version 1.17.1.1
License LGPL
Source module gst-plugins-bad
Binary package GStreamer Bad Plug-ins git
Origin URL Unknown package origin

mfmp3enc: Media Foundation MP3 Encoder ACM Wrapper MFT
mfaacenc: Media Foundation Microsoft AAC Audio Encoder MFT
mfvp9device1enc: Media Foundation VP9VideoExtensionEncoder
mfvp9enc: Media Foundation Intel® Hardware VP9 Encoder MFT
mfh265device1enc: Media Foundation HEVCVideoExtensionEncoder
mfh265enc: Media Foundation Intel® Hardware H265 Encoder MFT
mfh264device1enc: Media Foundation H264 Encoder MFT
mfh264enc: Media Foundation Intel® Quick Sync Video H.264 Encoder MFT
mfdeviceprovider: Media Foundation Device Provider
mfvideosrc: Media Foundation Video Source

10 features:
+-- 9 elements
+-- 1 device providers
  • mfvideosrc: This element is a source element which will capture video from your webcam. Note that you can use this element in your UWP application.
  • mfdeviceprovider: Available video capture devices can be enumerated by this device provider implementation, and it can provide corresponding mfvideosrc elements.
  • mf{h264,h265,vp9,aac,mp3}enc: Each element is responsible for encoding raw video/audio data into compressed data. In the above example, you can see two h264 encoders mfh264enc and mfh264device1enc. That’s the case when (Microsoft) has approved hardware MFT on your system, therefore hardware MFT will be registered first (with mfh264enc) and then a lower rank will be assigned to software MFT.

NOTE : To build the Media Foundation GStreamer plugin, you should use the MSVC compiler as there might be some missing symbols in MinGW toolchain.

Wait, where are audio sources?

Audio capture sources are not implemented in this plugin. Use the wasapi or wasapi2 plugin in this case. In general, audio processing requires more complicated timing information and control. Unfortunately, Media Foundation doesn’t provide such low-level control for users, but the wasapi API does.

A short comment about wasapi2 plugin is that it was introduced as part of GStreamer 1.17 for the purpose of UWP support. (It should work on Win32 application as well). As a result of UWP support, however, the wasapi2 plugin requires Windows 10 as it uses very new Windows APIs (probably it might work on Windows 8, but I’ve tested the wasapi2 plugin only on Windows 10).

Some codecs and software decoders are not implemented in this plugin yet, but I expect they should be added soon!
And regarding hardware video decoder implementations, please refer to my previous DXVA2 blog post

Sebastian Dröge: GStreamer Rust Bindings & Plugins New Releases

$
0
0

It has been quite a while since the last status update for the GStreamerRust bindings and the GStreamer Rust plugins, so the new releases last week make for a good opportunity to do so now.

Bindings

I won’t write too much about the bindings this time. The latest version as of now is 0.16.1, which means that since I started working on the bindings there were 8 major releases. In that same time there were 45 contributors working on the bindings, which seems quite a lot and really makes me happy.

Just as before, I don’t think any major APIs are missing from the bindings anymore, even for implementing subclasses of the various GStreamer types. The wide usage of the bindings in Free Software projects and commercial products also shows both the interest in writing GStreamer applications and plugins in Rust as well as that the bindings are complete enough and production-ready.

Most of the changes since the last status update involve API cleanups, usability improvements, various bugfixes and addition of minor API that was not included before. The details of all changes can be read in the changelog.

The bindings work with any GStreamer version since 1.8 (released more than 4 years ago), support APIs up to GStreamer 1.18 (to be released soon) and work with Rust 1.40 or newer.

Plugins

The biggest progress probably happened with the GStreamer Rust plugins.

There also was a new release last week, 0.6.0, which was the first release where selected plugins were also uploaded to the Rust package (“crate”) database crates.io. This makes it easy for Rust applications to embed any of these plugins statically instead of depending on them to be available on the system.

Overall there are now 40 GStreamer elements in 18 plugins by 28 contributors available as part of the gst-plugins-rs repository, one tutorial plugin with 4 elements and various plugins in external locations.

These 40 GStreamer elements are the following:

Audio
  • rsaudioecho: Port of the audioecho element from gst-plugins-good
  • rsaudioloudnorm: Live audio loudness normalization element based on the FFmpeg af_loudnorm filter
  • claxondec: FLAC lossless audio codec decoder element based on the pure-Rust claxon implementation
  • csoundfilter: Audio filter that can use any filter defined via the Csound audio programming language
  • lewtondec: Vorbis audio decoder element based on the pure-Rust lewton implementation
Video
  • cdgdec/cdgparse: Decoder and parser for the CD+G video codec based on a pure-Rust CD+G implementation, used for example by karaoke CDs
  • cea608overlay: CEA-608 Closed Captions overlay element
  • cea608tott: CEA-608 Closed Captions to timed-text (e.g. VTT or SRT subtitles) converter
  • tttocea608: CEA-608 Closed Captions from timed-text converter
  • mccenc/mccparse: MacCaption Closed Caption format encoder and parser
  • sccenc/sccparse: Scenarist Closed Caption format encoder and parser
  • dav1dec: AV1 video decoder based on the dav1d decoder implementation by the VLC project
  • rav1enc: AV1 video encoder based on the fast and pure-Rust rav1e encoder implementation
  • rsflvdemux: Alternative to the flvdemuxFLV demuxer element from gst-plugins-good, not feature-equivalent yet
  • rsgifenc/rspngenc: GIF/PNG encoder elements based on the pure-Rust implementations by the image-rs project
Text
  • textwrap: Element for line-wrapping timed text (e.g. subtitles) for better screen-fitting, including hyphenation support for some languages
Network
  • reqwesthttpsrc: HTTP(S) source element based on the Rust reqwest/hyper HTTP implementations and almost feature-equivalent with the main GStreamer HTTP source souphttpsrc
  • s3src/s3sink: Source/sink element for the Amazon S3 cloud storage
  • awstranscriber: Live audio to timed text transcription element using the Amazon AWS Transcribe API
Generic
  • sodiumencrypter/sodiumdecrypter: Encryption/decryption element based on libsodium/NaCl
  • togglerecord: Recording element that allows to pause/resume recordings easily and considers keyframe boundaries
  • fallbackswitch/fallbacksrc: Elements for handling potentially failing (network) sources, restarting them on errors/timeout and showing a fallback stream instead
  • threadshare: Set of elements that provide alternatives for various existing GStreamer elements but allow to share the streaming threads between each other to reduce the number of threads
  • rsfilesrc/rsfilesink: File source/sink elements as replacements for the existing filesrc/filesink elements

Sebastian Dröge: Automatic retry on error and fallback stream handling for GStreamer sources

$
0
0

A very common problem in GStreamer, especially when working with live network streams, is that the source might just fail at some point. Your own network might have problems, the source of the stream might have problems, …

Without any special handling of such situations, the default behaviour in GStreamer is to simply report an error and let the application worry about handling it. The application might for example want to restart the stream, or it might simply want to show an error to the user, or it might want to show a fallback stream instead, telling the user that the stream is currently not available and then seamlessly switch back to the stream once it comes back.

Implementing all of the aforementioned is quite some effort, especially to do it in a robust way. To make it easier for applications I implemented a new plugin called fallbackswitch that contains two elements to automate this.

It is part of the GStreamer Rust plugins and also included in the recent 0.6.0 release, which can also be found on the Rust package (“crate”) repository crates.io.

Installation

For using the plugin you most likely first need to compile it yourself, unless you’re lucky enough that e.g. your Linux distribution includes it already.

Compiling it requires a Rust toolchain and GStreamer 1.14 or newer. The former you can get via rustup for example, if you don’t have it yet, the latter either from your Linux distribution or by using the macOS, Windows, etc binaries that are provided by the GStreamer project. Once that is done, compiling is mostly a matter of running cargo build in the utils/fallbackswitch directory and copying the resulting libgstfallbackswitch.so (or .dll or .dylib) into one of the GStreamer plugin directories, for example ~/.local/share/gstreamer-1.0/plugins.

fallbackswitch

The first of the two elements is fallbackswitch. It acts as a filter that can be placed into any kind of live stream. It consumes one main stream (which must be live) and outputs this stream as-is if everything works well. Based on the timeout property it detects if this main stream didn’t have any activity for the configured amount of time, or everything arrived too late for that long, and then seamlessly switches to a fallback stream. The fallback stream is the second input of the element and does not have to be live (but it can be).

Switching between main stream and fallback stream doesn’t only work for raw audio and video streams but also works for compressed formats. The element will take constraints like keyframes into account when switching, and if necessary/possible also request new keyframes from the sources.

For example to play the Sintel trailer over the network and displaying a test pattern if it doesn’t produce any data, the following pipeline can be constructed:

gst-launch-1.0 souphttpsrc location=https://www.freedesktop.org/software/gstreamer-sdk/data/media/sintel_trailer-480p.webm ! \
    decodebin ! identity sync=true ! fallbackswitch name=s ! videoconvert ! autovideosink \
    videotestsrc ! s.fallback_sink

Note the identity sync=true in the main stream here as we have to convert it to an actual live stream.

Now when running the above command and disconnecting from the network, the video should freeze at some point and after 5 seconds a test pattern should be displayed.

However, when using fallbackswitch the application will still have to take care of handling actual errors from the main source and possibly restarting it. Waiting a bit longer after disconnecting the network with the above command will report an error, which then stops the pipeline.

To make that part easier there is the second element.

fallbacksrc

The second element is fallbacksrc and as the name suggests it is an actual source element. When using it, the main source can be configured via an URI or by providing a custom source element. Internally it then takes care of buffering the source, converting non-live streams into live streams and restarting the source transparently on errors. The various timeouts for this can be configured via properties.

Different to fallbackswitch it also handles audio and video at the same time and demuxes/decodes the streams.

Currently the only fallback streams that can be configured are still images for video. For audio the element will always output silence for now, and if no fallback image is configured for video it outputs black instead. In the future I would like to add support for arbitrary fallback streams, which hopefully shouldn’t be too hard. The basic infrastructure for it is already there.

To use it again in our previous example and having a JPEG image displayed whenever the source does not produce any new data, the following can be done:

gst-launch-1.0 fallbacksrc uri=https://www.freedesktop.org/software/gstreamer-sdk/data/media/sintel_trailer-480p.webm \
    fallback-uri=file:///path/to/some/jpg ! videoconvert ! autovideosink

Now when disconnecting the network, after a while (longer than before because fallbacksrc does additional buffering for non-live network streams) the fallback image should be shown. Different to before, waiting longer will not lead to an error and reconnecting the network causes the video to reappear. However as this is not an actual live-stream, right now playback would again start from the beginning. Seeking back to the previous position would be another potential feature that could be added in the future.

Overall these two elements should make it easier for applications to handle errors in live network sources. While the two elements are still relatively minimal feature-wise, they should already be usable in various real scenarios and are already used in production.

As usual, if you run into any problems or are missing some features, please create an issue in the GStreamer bug tracker.

Michael Sheldon: Emoji Support for Linux Flutter Apps

$
0
0

Recently Canonical have been working alongside Google to make it possible to write native Linux apps with Flutter. In this short tutorial, I’ll show you how you can render colour fonts, such as emoji, within your Flutter apps.

First we’ll create a simple application that attempts to display a few emoji:

import 'package:flutter/material.dart';

void main() {
  runApp(EmojiApp());
}

class EmojiApp extends StatelessWidget {
  @override
  Widget build(BuildContext context) {
    return MaterialApp(
      title: 'Emoji Demo',
      theme: ThemeData(
        primarySwatch: Colors.blue,
        visualDensity: VisualDensity.adaptivePlatformDensity,
      ),
      home: EmojiHomePage(title: '🐹 Emoji Demo 🐹'),
    );
  }
}

class EmojiHomePage extends StatefulWidget {
  EmojiHomePage({Key key, this.title}) : super(key: key);
  final String title;

  @override
  _EmojiHomePageState createState() => _EmojiHomePageState();
}

class _EmojiHomePageState extends State {

  @override
  Widget build(BuildContext context) {
    return Scaffold(
      appBar: AppBar(
        title: Text(
          widget.title,
        ),
      ),
      body: Center(
        child: Text(
          '🐶 🐈 🐇',
        ),
      ),
    );
  }
}

However, when we run it we find that our emoji characters aren’t rendering correctly:

Screenshot showing application failing to render emoji

For Flutter to be able to display colour fonts we need to explicitly bundle them with our application. We can do this by saving the emoji font we wish to use to our project directory, to keep things organised I’ve created a sub-directory called ‘fonts’ for this. Then we need to edit our ‘pubspec.yaml’ to include information about this font file:

name: emojiexample
description: An example of displaying emoji in Flutter apps
publish_to: 'none'
version: 1.0.0+1
environment:
  sdk: ">=2.7.0 <3.0.0"

dependencies:
  flutter:
    sdk: flutter

dev_dependencies:
  flutter_test:
    sdk: flutter

flutter:
  uses-material-design: true
  fonts:
     - family: EmojiOne
       fonts:
         - asset: fonts/emojione-android.ttf

I’m using the original EmojiOne font, which was released by Ranks.com under the Creative Commons Attribution 4.0 License.

Finally, we need to update our application code to specify the font family to use when rendering text:

class _EmojiHomePageState extends State {

  @override
  Widget build(BuildContext context) {
    return Scaffold(
      appBar: AppBar(
        title: Text(
          widget.title,
          style: TextStyle(fontFamily: 'EmojiOne'),
        ),
      ),
      body: Center(
        child: Text(
          '🐶 🐈 🐇',
          style: TextStyle(fontFamily: 'EmojiOne', fontSize: 32),
        ),
      ),
    );
  }
}

Now when we run our app our emoji are all rendered as expected:

Screenshot showing emoji rendering correctly width=

The full source code for this example can be found here: https://github.com/Elleo/flutter-emojiexample


GStreamer: GStreamer 1.17.90 pre-release (1.18 rc1)

$
0
0

The GStreamer team is pleased to announce the first release candidate for the upcoming stable 1.18 release series.

The unstable 1.17 release series adds new features on top of the current stable 1.16 series and is part of the API and ABI-stable 1.x release series of the GStreamer multimedia framework.

The 1.17.90 pre-release series is for testing and development purposes in the lead-up to the stable 1.18 series which is now feature frozen and scheduled for release soon. Any newly-added API can still change until that point, although it is very rare for that to happen at this point.

Depending on how things go there might be another release candidate next week and then hopefully 1.18.0 shortly after.

Full release notes will be provided in the near future, highlighting all the new features, bugfixes, performance optimizations and other important changes.

The autotools build has been dropped entirely for this release, so it's finally all Meson from here on.

This pre-release is for all developers, distributors and early adaptors and anyone who still needs to update their build/packaging setup for Meson.

On the documentation front we have switched away from gtk-doc to hotdoc, but we now provide a release tarball of the built documentation in html and devhelp format, and we recommend distributors switch to that and provide a single gstreamer documentation package in future. Packagers will not need to use hotdoc themselves.

Instead of a gst-validate tarball we now ship a gst-devtools tarball, and the gstreamer-editing-services tarball has been renamed to gst-editing-services for consistency with the module name in Gitlab.

Packagers: please note that plugins may have moved between modules, so please take extra care and make sure inter-module version dependencies are such that users can only upgrade all modules in one go, instead of seeing a mix of 1.17 and 1.16 on their system.

Binaries for Android, iOS, Mac OS X and Windows are also available at the usual location.

Release tarballs can be downloaded directly here:

As always, please let us know of any issues you run into by filing an issue in Gitlab.

Gustavo Orrillo: Special collections’ design process

$
0
0

The visualization we developed for the Network of Libraries of the Bank of the Republic of Colombia is a web tool that allows users to create their own search paths through the special documents and collections available in the libraries. This project took around 6 months of work, form initial research and sketching to the final product that is currently in use. It gave us a unique opportunity to apply novel frameworks and technologies for web development such as p5.js to make the rich cultural heritage deposited at the Network of Libraries more easily accessible to a wide range of users, from ocassional visitors to expert researchers. This post shows some of the visual materials and concepts that inspired the tool, as well as design sketches and prototypes.

Early UI sketch

Background

The Network of Libraries of the Bank of the Republic is the depository of more than thirty-five historical archives that constitute a primary source for the reconstruction of the history of Colombia. Researchers and historians can consult most of these archives in the Room of Rare Books and Manuscripts of the Luis Ángel Arango Library; however, some of these archives are available at other cultural centers of the Bank of the Republic around the country.

When we started working on this project, several of the materials were available in digital through a web portal where the information was organized in various thematic groupings and by document types. Analysis of this portal revealed the following features:

  • Most of the data had already been digitized
  • A fraction of the contents were available through a “pre-made” timeline visualization implemented with an existing javascript library.
  • Another part of the contents were available through different interfaces (list, maps, etc)
  • There was little connection between all the contents, each topic had to be visualized within its own separate page

The major aims of the interactive visualization to be developed were the following:

  • to gives a more holistic access to the contents of the site
  • to emphasize relationships between separate themes and types of materials, and facilitate finding contents and understanding the context of these contents

Time-based data

As the special documents and collections had a strong temporal dimension, and timelines were used in the original version of the website, we started exploring timeline-based visualizations of the data. The slideshow below contains some previous projects we considered in our research:

A timeline of history - https://histography.io/World Digital Library Timelines - https://www.wdl.org/en/timelines/Interactive Blog Calendar - https://eagereyes.org/blog-calendarSummit on the SummitAnnual Reports - https://fathom.info/reports

Visualizations using the timeline metaphor.

Two issues with the use timelines to visualize the collections from the Network of Libraries were that the data is sparsely populated, and that some items could cover a very wide time range, for example 50 years or even more. So the problem became how to handle such a large interval properly in a traditional timeline? Because of this issue, we looked into more dynamic approaches. The interactive timelines in the New Cooper Hewitt Experience at the Smithsonian Cooper Hewitt Museum in New York:

and the Timeline of Modern Art at Tate Modern in London:

are great examples where museum’s collections are form a flowing stream where visitors can select and manipulate the items they find interesting.

Seach processes

Another concept that we considered early on was that of serendipitous search, as suggested by the following picture of a library user browsing the shelves:

Browsing the shelves

To us, this idea of serendipitous search resonated with Psychogeography, the term coined in the 1950s by the Situationists and denoting the “exploration of urban environments that emphasizes playfulness and drifting”. Can we transfer this practice into the visualization of cultural materials to create some kind of “Librageography” or “Bibliogeografía”, which prioritizes playful search? Some visual inspiration related to these concepts:

In particular, the psychogeographic concept of drifting led to the idea of a visual exploration where each user constructs their own map of the data by wandering through the connections between the data elements, defined by the common tags shared by the collections. The following early sketch offer a glimpse of these schemes:

First hand-drawn sketch

While a drifting navigation through the collections could provide an engaging and playful experience for ocassional users, the visualization should also offer tools for a more directed search that advanced users may need when researching the data or looking for specific information. A first mockup of the web viewer incorporates such tools:

First hand-drawn sketch

Refining the design

Once we identified an initial visual metaphor and navigation mechanism, it was the time to start iterating over the early sketches while discussing the progress with the team from the Virtual Library of the Bank of the Republic, who was in charge of the project.

The prototype also supported mobile phones since the beginning, as it was very important that the web visualizer was accessible through both desktop and mobile:

Mobile prototype

In parallel to the design of the main visualization screen, we also starting sketching the intro screen. This is also very important, as the intro screen is the entry point to the visualization, and it may disuade users, specially newcomers, to stay in the page and explore the data:

Sketches of intro screen

We developed a working prototype based on those initial designs and sketches, which allowed us to test the basic user flows and iterate the designs to obtain feedback quickly:

Once we agreed on the overall modes of introduction, presentation and interaction, we started refining the visual appareance of the prototype through color, textures, text, animation, and mutual relationships of all the elements:

Work on the UI was also ongoing at this stage:

After a few rounds additional rounds of design iterations, the color palette and UI improved significantly, and at that stage we were approaching the final version, with only a few minor tweaks left:

Responsive design

With a great majority of users navigating the web on their phones, a big priority for us was to ensure that the viewer worked well on mobile browsers. In the end, we were able to keep the functionality and appereance consistent across desktop, iOS, and Android, while dealing with the differences in screen state and interaction modalities (i.e.: touch vs mouse):

Conclusions

The Virtual Library of the Bank of the Republic released the new Special Documents and Collections portal, including the interactive viewer, in November of 2019. We are very satisfied with the design process described here as well as with the final product. We believe that we created an useful tool for cultural promotion and research in the humanities, and we hope to gain insight on the user engagement with the viewer based on the analytics collected by the portal.

Christian Schaller: First Lenovo laptop with Fedora now available on the web!

$
0
0

This weekend the X1 Carbon with Fedora Workstation went live in North America on Lenovos webstore. This is a big milestone for us and for Lenovo as its the first time Fedora ships pre-installed on a laptop from a major vendor and its the first time the worlds largest laptop maker ships premium laptops with Linux directly to consumers. Currently only the X1 Carbon is available, but more models is on the way and more geographies will get added too soon. As a sidenote, the X1 Carbon and more has actually been available from Lenovo for a couple of Months now, it is just the web sales that went online now. So if you are a IT department buying Lenovo laptops in bulk, be aware that you can already buy the X1 Carbon and the P1 for instance through the direct to business sales channel.

Also as a reminder for people looking to deploy Fedora laptops or workstations in numbers, be sure to check out Fleet Commander our tool for helping you manage configurations across such a fleet.

I am very happy with the work that has been done here to get to this point both by Lenovo and from the engineers on my team here at Red Hat. For example Lenovo made sure to get all of their component makers to ramp up their Linux support and we have been working with them to both help get them started writing drivers for Linux or by helping add infrastructure they could plug their hardware into. We also worked hard to get them all set up on the Linux Vendor Firmware Service so that you could be assured to get updated firmware not just for the laptop itself, but also for its components.

We also have a list of improvements that we are working on to ensure you get the full benefit of your new laptops with Fedora and Lenovo, including working on things like improved power management features being able to have power consumption profiles that includes a high performance mode for some laptops that will allow it to run even faster when on AC power and on the other end a low power mode to maximize battery life. As part of that we are also working on adding lap detection support, so that we can ensure that you don’t risk your laptop running to hot in your lap and burning you or that radio antennas are running to strong when that close to your body.

So I hope you decide to take the leap and get one of the great developer laptops we are doing together with Lenovo. This is a unique collaboration between the worlds largest laptop maker and the worlds largest Linux company. What we are doing here isn’t just a minimal hardware enablement effort, but a concerted effort to evolve Linux as a laptop operating system and doing it in a proper open source way. So this is the culmination of our work over the last few years, creating the LVFS, adding Thunderbolt support to Linux, improving fingerprint reader support in Linux, supporting HiDPI screens, supporting hidpi mice, creating the possibility of a secure desktop with Wayland, working with NVidia to ensure that Mesa and Nvidia driver can co-exist through glvnd, creating Flatpak to ensure we can bring the advantages of containers to the desktop space and at the same way do it in a vendor neutral way. So when you buy a Lenovo laptop with Fedora Workstation, you are not just getting a great system, but you are also supporting our efforts to take Linux to the next level, something which I think we are truly the only linux vendor with the scale and engineering ability to do.

Of course we are not stopping here, so let me also use this chance to talk a bit about some of our other efforts.

Toolbox
Containers are popular for deploying software, but a lot of people are also discovering now that they are an incredible way to develop software, even if that software is not going to be deployed as a Flatpak or Kubernetes container. The term often used for containers when used as a development tool is pet containers and with Toolbox project we are aiming to create the best tool possible for developers to work with pet containers. Toolbox allows you to have always have a clean environment to work in which you can change to suit each project you work on, however you like, without affecting your host system. So for instance if you need to install a development snapshot of Python you can do that inside your Toolbox container and be confident that various other parts of your desktop will not start crashing due to the change. And when your are done with your project and don’t want that toolbox around anymore you can easily delete it without having to spend time to figure out which packages you installed can now be safely uninstalled from your host system or just not bother and have your host get bloated over time with stuff you are not actually using anymore.

One big advantage we got at Red Hat is that we are a major contributor to container technologies across the stack. We are a major participant in the Open Container Initiative and we are alongside Google the biggest contributor to the Kubernetes project. This includes having created a set of container tools called Podman. So when we started prototyping Toolbox we could base it up on podman and get access to all the power and features that podman provides, but at the same make them easier to use and consumer from your developer laptop or workstation.

Our initial motivation was also driven by the fact that for image based operating systems like Fedora Silverblue and Fedora CoreOS, where the host system is immutable you still need some way to be able to install packages and do development, but we quickly realized that the pet container development model is superior to the old ‘on host’ model even if you are using a traditional package based system like Fedora Workstation. So we started out by prototyping the baseline functionality, writing it as a shell script to quickly test out our initial ideas. Of course as Toolbox picked up in popularity we realized we needed to transition quickly to a proper development language so that we wouldn’t end up with an unmaintainable mess written in shell, and thus Debarshi Ray and Ondřej Míchal has recently completed the rewrite to Go (Note: the choice of Go was to make it easier for the wider container community to contribute since almost all container tools are written in Go).

Leading up towards Fedora Workstation 33 we are trying figure out a few things. One is how we can make giving you access to a RHEL based toolbox through the Red Hat Developer Program in an easy and straightforward manner, and this is another area where pet container development shines. You can set up your pet container to run a different Linux version than your host. So you can use Fedora to get the latest features for your laptop, but target RHEL inside your Toolbox to get an easy and quick deployment path to your company RHEL servers. I would love it if we can extend this even further as we go along, to for instance let you set up a Steam runtime toolbox to do game development targeting Steam.
Setting up a RHEL toolbox is already technically possible, but requires a lot more knowledge and understanding of the underlaying technologies than we wish.
The second thing we are looking at is how we deal with graphical applications in the context of these pet containers. The main reason we are looking at that is because while you can install for instance Visual Studio code inside the toolbox container and launch it from the command line, we realize that is not a great model for how you interact with GUI applications. At the moment the only IDE that is set up to be run in the host, but is able to interact with containers properly is GNOME Builder, but we realize that there are a lot more IDEs people are using and thus we want to try to come up with ways to make them work better with toolbox containers beyond launching them from the command line from inside the container. There are some extensions available for things like Visual Studio Code starting to try to improve things (those extensions are not created by us, but looking at solving a similar problem), but we want to see how we can help providing a polished experience here. Over time we do believe the pet container model of development is so good that most IDEs will follow in GNOME Builders footsteps and make in-container development a core part of the feature set, but for now we need to figure out a good bridging strategy.

Wayland – headless and variable refresh rate.
Since switching to Wayland we have continued to work in improving how GNOME work under Wayland to remove any major feature regressions from X11 and to start taking advantage of the opportunities that Wayland gives us. One of the last issues that Jonas Ådahl has been hard at work recently is trying to ensure we have headless support for running GNOME on systems without a screen. We know that there are a lot of sysadmins for instance who want to be able to launch a desktop session on their servers to be used as a tool to test and debug issues. These desktops are then accessed through tools such as VNC or Nice DCV. As part of that work he also made sure we could deal with having multiple monitors connected which had different refresh rates. Before that fix you would get the lowest common denominator between your screens, but now if you for instance got a 60Hz monitor and a 75Hz monitor they will be able to function independent of each other and run at their maximum refresh rate. With the variable refresh rate work now landed upstream Jonas is racing to get the headless support finished and landed in time for Fedora Workstation 33.

Linux Vendor Firmware Service
Richard Hughes is continuing his work on moving the LVFS forward having spent time this cycle working with the Linux Foundation to ensure the service can scale even better. He is also continuously onboarding new vendors and helping existing vendors use LVFS for even more things. We are now getting reports that LVFS has become so popular that we are now getting reports of major hardware companies who up to know hasn’t been to interested in the LVFS are getting told by their customers to start using it or they will switch supplier. So expect the rapid growth of vendors joining the LVFS to keep increasing. It is also worth nothing that many of vendors who are already set up on LVFS are steadily working on increasing the amount of systems they support on it and pushing their suppliers to do the same. Also for enterprise use of LVFS firmware Marc Richter also wrote an article on access.redhat.com about how to use LVFS with Red Hat Satelitte. Satellite for those who don’t know it is Red Hats tool for managing and keeping servers up to date and secure. So for large companies having their machines, especially servers, accessing LVFS directly is not a wanted behaviour, so now they can use Satelitte to provide a local repository of the LVFS firmware.

PipeWire
One of the changes we been working on that I am personally extremely excited about is PipeWire

. For those of you who don’t know it, PipeWire is one of our major swamp draining efforts which aims to bring together audio, pro-audio and video under linux and provide a modern infrastructure for us to move forward. It does so however while being ABI compatible with both Jack and PulseAudio, meaning that applications will not need to be ported to work with PipeWire. We have been using it for a while for video already to handle screen capture under Wayland and for allowing Flatpak containers access to webcams in a secure way, but Wim Taymans has been working tirelessly on moving that project forward over the last 6 Months, focused a lot of fixing corner cases in the Jack support and also ramping up the PulseAudio support. We had hoped to start wide testing in Fedora Workstation 32 of the audio parts of PipeWire, but we decided that since such a key advantage that PipeWire brings is not just to replace Jack or PulseAudio, but also to ensure the two usecases co-exist and interact properly, we didn’t want to start asking people to test until we got the PulseAudio support close to being production ready. Wim has been making progress by leaps and bounds recently and while I can’t 100% promise it yet we do expect to roll out the audio bits of PipeWire for more widescale testing in Fedora Workstation 33 with the goal of making it the default for Fedora Workstation 34 or more likely Fedora Workstation 35.
Wim is doing an internal demo this week, so I will try to put out a blog post talking about that later in the week.

Flatpak – incremental updates
One of the features we added to Flatpaks was the ability to distribute them as Open Container Initiative compliant containers. The reason for this was that as companies, Red Hat included, built infrastructure for hosting and distributing containers we could also use that for Flatpaks. This is obviously a great advantage for a variety of reasons, but it had one large downside compared to the traditional way of distributing Flatpaks (as Ostree images) which is that each update comes as a single large update as opposed to the atomic update model that OStree provides.
Which is why if you would compare the same application when shipping from Flathub, which uses Ostree, versus from the Fedora container registry, you would quickly notice that you get a lot smaller updates from Flathub. For kubernetes containers this hasn’t been considered a huge problem as their main usecase is copying the containers around in a high-speed network inside your cloud provider, but for desktop users this is annoying. So Alex Larsson and Owen Taylor has been working on coming up with a way to do to incremental updates for OCI/Docker/Kubernetes containers too, which not only means we can get very close to the Flathub update size in the Fedora Container Catalog, but it also means that since we implemented this in a way that works for all OCI/Kubernetes containers you will be able to get them too with incremental update functionality. Especially as such containers are making their way into edge computing where update sizes do matter, just like they do on the desktop.

Hangul input under Wayland
Red Hat, like Lenovo, targets most of the world with our products and projects. This means that we want them to work great even for people who doesn’t use English or another European language. To achieve this we have a team dedicated to ensuring that not just Linux, but all Red Hat products work well for international users as part of my group at Red Hat. That team, lead by Jens Petersen, is distributed around the globe with engineers in Japan, China, India, Singapore and Germany. This team contributes to a lot of different things like font maintenance, input method development, i18n infrastructure and more.
One thing this team recently discovered was that the support for Korean input under Wayland. So Peng Wu, Takao Fujiwara and Carlos Garnacho worked together to come up with a series of patches for ibus and GNOME Shell to ensure that Fedora Workstation on Wayland works perfectly for Korean input. I wanted to highlight this effort because while I don’t usually mention efforts which such a regional impact in my blog posts it is a critical part of keeping Linux viable and usable across the globe. And ensuring that you can use your computer in your own language is something we feel is important and want to enable and also an area where I believe Red Hat is investing more than any other vendor out there.

GLX on EGL
We meet with NVidia on a regular basis to discuss topics of shared interest and one thing we been looking at for a while now is the best way to support Nvidia binary driver under XWayland. As part of that Adam Jackson has been working on a research project to see how feasible it would be to create a way to run GLX applications on top of EGL. As one might imagine EGL doesn’t have a 1to1 match with GLX APIs, but based on what we seen so far is that it should be close enough to get things going (Adam already got glxgears running :). The goal here would be to have an initial version that works ok, and then in collaboration with NVidia we can evolve it to be a great solution for even the most demanding OpenGL/GLX applications. Currently the code causes an extra memcopy compared to running on GLX native, but this is something we think can be resolved in collaboration with NVidia. Of course this is still an early stage effort and Adam and NVidia are currently looking at it so there is of course a chance still we will hit a snag and have to go back to the drawing board. For those interested you can take a look at this Mesa merge request to see the current state.

Nirbheek Chauhan: GStreamer 1.18 supports the Universal Windows Platform

$
0
0
tl;dr: The upcoming GStreamer 1.18 release will ship with UWP support out of the box, and there will be official gstreamer binary releases for it. Try out the 1.17.90 pre-release and let us know how it goes! There's also an example gstreamer app for UWP that showcases OpenGL support (via ANGLE), audio/video capture, hardware codecs, and WebRTC.

Short History Lesson

 
Last year at the GStreamer Conference in Lyon, I gave a talk (slides) about how “Firefox Reality” for the Microsoft HoloLens 2 mixed-reality headset is actually Servo, and it uses GStreamer for all media handling: WebAudio, HTML5 Video, and WebRTC.

I also spoke about the work we at Centricular did to port GStreamer to the HoloLens 2. The HoloLens 2 uses the new development target for Windows Store apps: the Universal Windows Platform. The majority of win32 APIs have been deprecated, and apps have to use the new Windows Runtime, which is a language-agnostic API written from the ground up.

So the majority of work went into making sure that Win32 code didn't use deprecated APIs (we used a bunch of them!), and making sure that we could build using the UWP toolchain. Most of that involved two components:
  • GLib, a cross-platform low-level library / abstraction layer used by GNOME (almost all our win32 code is in here)
  • Cerbero, the build aggregator used by GStreamer to build binaries for all platforms supported: Android, iOS, Linux, macOS, Windows (MSVC, MinGW, UWP)
The target was to port the core of GStreamer, and those plugins with external dependencies that were needed to do playback in <audio> and <video> tags. This meant that the only external plugin dependency we needed was FFmpeg, for the gst-libav plugin. All this went well, and Firefox Reality successfully shipped with that work.

Upstreaming and WebRTC

 
Building upon that work, for the past few months we've been working on adding support for the WebRTC plugin, and also upstreaming as much of the work as possible. This involved a bunch of pieces:
  1. Use only OpenSSL and not GnuTLS in Cerbero because OpenSSL supports targeting UWP. This also had the advantage of moving us from two SSL stacks to one.
  2. Port a bunch of external optional dependencies to Meson so that they could be built with Meson, which is the easiest way for a cross-platform project to support UWP. If your Meson project builds on Windows, it will build on UWP with minimal or no build changes.
  3. Rebase the GLib patches that I didn't find the time to upstream last year on top of 2.62, split into smaller pieces that will be easier to upstream, update for new Windows SDK changes, remove some of the hacks, and so on.
  4. Rework and rewrite the Cerbero patches I wrote last year that were in no shape to be upstreamed.
  5. Ensure that our OpenGL support continues to work using Servo's ANGLE UWP port
  6. Write a new plugin for audio capture called wasapi2, great work by Seungha Yang.
  7. Write a new plugin for video capture called mfvideosrc as part of the media foundation plugin which is new in GStreamer 1.18, also by Seungha.
  8. Write a new example UWP app to test all this work, also done by Seungha! 😄
  9. Run the app through the Windows App Certification Kit
And several miscellaneous tasks and bugfixes that we've lost count of.

Our highest priority this time around was making sure that everything can be upstreamed to GStreamer, and it was quite a success! Everything needed for WebRTC support on UWP has been merged, and you can use GStreamer in your UWP app by downloading the official GStreamer binaries starting with the 1.18 release.

On top of everything in the above list, thanks to Seungha, GStreamer on UWP now also supports:

Try it out!

 
The example gstreamer app I mentioned above showcases all this. Go check it out, and don't forget to read the README file!
 

Next Steps

 
The most important next step is to upstream as many of the GLib patches we worked on as possible, and then spend time porting a bunch of GLib APIs that we currently stub out when building for UWP.

Other than that, enabling gst-libav is also an interesting task since it will allow apps to use FFmpeg software codecs in their gstreamer UWP app. People should use the hardware accelerated d3d11 decoders and mediafoundation encoders for optimal power consumption and performance, but sometimes it's not possible because codec support is very device-dependent. 

Parting Thoughts

 
I'd like to thank Mozilla for sponsoring the bulk of this work. We at Centricular greatly value partners that understand the importance of working with upstream projects, and it has been excellent working with the Servo team members, particularly Josh Matthews, Alan Jeffrey, and Manish Goregaokar.

In the second week of August, Mozilla restructured and the Servo team was one of the teams that was dissolved. I wish them all the best in their future endeavors, and I can't wait to see what they work on next. They're all brilliant people.

Thanks to the forward-looking and community-focused approach of the Servo team, I am confident that the project will figure things out to forge its own way forward, and for the same reason, I expect that GStreamer's UWP support will continue to grow.

Xabier Rodríguez Calvar: Serious Encrypted Media Extensions on GStreamer based WebKit ports

$
0
0

Encrypted Media Extensions (a.k.a. EME) is the W3C standard for encrypted media in the web. This way, media providers such as Hulu, Netflix, HBO, Disney+, Prime Video, etc. can provide their contents with a reasonable amount of confidence that it will make it very complicated for people to “save” their assets without their permission. Why do I use the word “serious” in the title? In WebKit there is already support for Clear Key, which is the W3C EME reference implementation but EME supports more encryption systems, even privative ones (I have my opinion about this, you can ask me privately). No service provider (that I know) supports Clear Key, they usually rely on Widevine, PlayReady or some other.

Three years ago, my colleague Žan Doberšek finished the implementation of what was going to be the shell of WebKit’s modern EME implementation, following latest W3C proposal. We implemented that downstream (at Web Platform for Embedded) as well using Thunder, which includes as a plugin a fork of what was Open Content Decryption Module (a.k.a. OpenCDM). The OpenCDM API changed quite a lot during this journey. It works well and there are millions of set-top-boxes using it currently.

The delta between downstream and the upstream GStreamer based WebKit ports was quite big, testing was difficult and syncing was not always easy, so we decided reverse the situation.

Our first step was done by my colleague Charlie Turner, who made Clear Key work upstream again while adapted some changes the Apple folks had done meanwhile. It was amazing to see Clear Key tests passing again and his work with the CDMProxy related classes was awesome. After having ClearKey working, I had to adapt them a bit to accomodate Thunder. To explain a bit about the WebKit EME architecture, I must say that there are two layers. The first is the crossplatform one, which implements the W3C API (MediaKeys, MediaKeySession, CDM…). These classes rely on the platform ones (CDMPrivate, CDMInstance, CDMInstanceSession) to handle the platform management, message exchange, etc. which would be the second layer. Apple playback system is fully integrated with their DRM system so they don’t need anything else. We do because we need to integrate our own decryptors to defer to Thunder for decryption so in the GStreamer based ports we also need the CDMProxy related classes, which would be CDMProxy, CDMInstanceProxy, CDMInstanceSessionProxy… The last two extend CDMInstance and CDMInstanceSession respectively to be able to deal with the key management, that is abstracted to the KeyHandle and KeyStore.

Once the abstraction is there (let’s remember that the abstranction works both for Clear Key and Thunder), the Thunder implementation is quite simple, justgluing the CDMProxy, CDMInstanceProxy and CDMInstanceSessionProxy classes to the Thunder system and writing a GStreamer decryptor element for it. I might have made a mistake when selecting the files but considering Thunder classes + the GStreamer common decryptor code, cloc says it is just 1198 lines of platform code. I think it is pretty low for what it does. Apart from that, obviously, there are 5760 lines of crossplatform code.

To build and run all this you need to do several things:

  1. Build the dependencies with WEBKIT_JHBUILD=1 JHBUILD_ENABLE_THUNDER="yes" to enable the old fashioned JHBuild build and force it to build the Thunder dependencies. All dependendies are on JHBuild, even Widevine is referenced but to download it you need the proper credentials as it is closed source.
  2. Pass --thunder when calling build-webkit.sh.
  3. Run MiniBrowser with WEBKIT_GST_EME_RANK_PRIORITY="Thunder" and pass parameters --enable-mediasource=TRUE --enable-encrypted-media=TRUE --autoplay-policy=allow. The autoplay policy is usually optional but in this case it is necessary for the YouTube TV tests. We need to give the Thunder decryptor a higher priority because of WebM, that does not specify a key system and without it the Clear Key one can be selected and fail. MP4 does not create trouble because the protection system is specified and the caps negotiation does its magic.

As you could have guessed if you have a closer look at the GStreamer JHBuild moduleset, you’ll see that only Widevine is supported. To support more, you only have to make them build in the Thunder ecosystem and add them to CDMFactoryThunder::supportedKeySystems.

When I coded this, all YouTube TV tests for Widevine were green in the desktop. At the moment of writing this post they aren’t because of some problem with the Widevine installation that will be sorted quickly, I hope.

Christian Schaller: PipeWire Late Summer Update 2020

$
0
0

Wim Taymans

Wim Taymans talking about current state of PipeWire


Wim Taymans did an internal demonstration yesterday for the desktop team at Red Hat of the current state of PipeWire. For those still unaware PipeWire is our effort to bring together audio, video and pro-audio under Linux, creating a smooth and modern experience. Before PipeWire there was PulseAudio for consumer audio, Jack for Pro-audio and just unending pain and frustration for video. PipeWire is being done with the aim of being ABI compatible with ALSA, PulseAudio and JACK, meaning that PulseAudio and Jack apps should just keep working on top of Pipewire without the need for rewrites (and with the same low latency for JACK apps).

As Wim reported yesterday things are coming together with both the PulseAudio, Jack and ALSA backends being usable if not 100% feature complete yet. Wim has been running his system with Pipewire as the only sound server for a while now and things are now in a state where we feel ready to ask the wider community to test and help provide feedback and test cases.

Carla on PipeWire

Carla running on PipeWire

Carla as shown above is a popular Jack applications and it provides among other things this patchbay view of your audio devices and applications. I recommend you all to click in and take a close look at the screenshot above. That is the Jack application Carla running and as you see PulseAudio applications like GNOME Settings and Google Chrome are also showing up now thanks to the unified architecture of PipeWire, alongside Jack apps like Hydrogen. All of this without any changes to Carla or any of the other applications shown.

At the moment Wim is primarily testing using Cheese, GNOME Control center, Chrome, Firefox, Ardour, Carla, vlc, mplayer, totem, mpv, Catia, pavucontrol, paman, qsynth, zrythm, helm, Spotify and Calf Studio Gear. So these are the applications you should be getting the most mileage from when testing, but most others should work too.

Anyway, let me quickly go over some of the highlight from Wim’s presentation.

Session Manager

PipeWire now has a functioning session manager that allows for things like

  • Metadata, system for tagging objects with properties, visible to all clients (if permitted)
  • Load and save of volumes, automatic routing
  • Default source and sink with metadata, saved and loaded as well
  • Moving streams with metadata

Currently this is a simple sample session manager that Wim created himself, but we also have a more advanced session manager called Wireplumber being developed by Collabora, which they developed for use in automotive Linux usecases, but which we will probably be moving to over time also for the desktop.

Human readable handling of Audio Devices

Wim took the code and configuration data in Pulse Audio for ALSA Card Profiles and created a standalone library that can be shared between PipeWire and PulseAudio. This library handles ALSA sound card profiles, devices, mixers and UCM (use case manager used to configure the newer audio chips (like the Lenovo X1 Carbon) and lets PipeWire provide the correct information to provide to things like GNOME Control Center or pavucontrol. Using the same code as has been used in PulseAudio for this has the added benefit that when you switch from PulseAudio to PipeWire your devices don’t change names. So everything should look and feel just like PulseAudio from an application perspective. In fact just below is a screenshot of pavucontrol, the Pulse Audio mixer application running on top of Pipewire without a problem.

PulSe Audio Mixer

Pavucontrol, the Pulse Audio mixer on Pipewire

Creating audio sink devices with Jack
Pipewire now allows you to create new audio sink devices with Jack. So the example command below creates a Pipewire sink node out of calfjackhost and sets it up so that we can output for instance the audio from Firefox into it. At the moment you can do that by running your Jack apps like this:

PIPEWIRE_PROPS="media.class=Audio/Sink" calfjackhost

But eventually we hope to move this functionality into the GNOME Control Center or similar so that you can do this setup graphically. The screenshot below shows us using CalfJackHost as an audio sink, outputing the audio from Firefox (a PulseAudio application) and CalfJackHost generating an analyzer graph of the audio.

Calfjackhost on pipewire

The CalfJackhost being used as an audio sink for Firefox

Creating devices with GStreamer
We can also use GStreamer to create PipeWire devices now. The command belows take the popular Big Buck Bunny animation created by the great folks over at Blender and lets you set it up as a video source in PipeWire. So for instance if you always wanted to play back a video inside Cheese for instance, to apply the Cheese effects to it, you can do that this way without Cheese needing to change to handle video playback. As one can imagine this opens up the ability to string together a lot of applications in interesting ways to achieve things that there might not be an application for yet. Of course application developers can also take more direct advantage of this to easily add features to their applications, for instance I am really looking forward to something like OBS Studio taking full advantage of PipeWire.

gst-launch-1.0 uridecodebin uri=file:///home/wim/data/BigBuckBunny_320x180.mp4 ! pipewiresink mode=provide stream-properties="props,media.class=Video/Source,node.description=BBB"

Cheese paying a video through pipewire

Cheese playing a video provided by GStreamer through PipeWire.

How to get started testing PipeWire
Ok, so after seeing all of this you might be thinking, how can I test all of this stuff out and find out how my favorite applications work with PipeWire? Well first thing you should do is make sure you are running Fedora Workstation 32 or later as that is where we are developing all of this. Once you done that you need to make sure you got all the needed pieces installed:

sudo dnf install pipewire-libpulse pipewire-libjack pipewire-alsa

Once that dnf command finishes you run the following to get PulseAudio replaced by PipeWire.


cd /usr/lib64/

sudo ln -sf pipewire-0.3/pulse/libpulse-mainloop-glib.so.0 /usr/lib64/libpulse-mainloop-glib.so.0.999.0
sudo ln -sf pipewire-0.3/pulse/libpulse-simple.so.0 /usr/lib64/libpulse-simple.so.0.999.0
sudo ln -sf pipewire-0.3/pulse/libpulse.so.0 /usr/lib64/libpulse.so.0.999.0

sudo ln -sf pipewire-0.3/jack/libjack.so.0 /usr/lib64/libjack.so.0.999.0
sudo ln -sf pipewire-0.3/jack/libjacknet.so.0 /usr/lib64/libjacknet.so.0.999.0
sudo ln -sf pipewire-0.3/jack/libjackserver.so.0 /usr/lib64/libjackserver.so.0.999.0

sudo ldconfig


(you can also find those commands here

Once you run these commands you should be able to run

pactl info

and see this as the first line returned:
Server String: pipewire-0

I do recommend rebooting, to be 100% sure you are on a PipeWire system with everything outputting through PipeWire. Once that is done you are ready to start testing!

Our goal is to use the remainder of the Fedora Workstation 32 lifecycle and the Fedora Workstation 33 lifecycle to stabilize and finish the last major features of PipeWire and then start relying on it in Fedora Workstation 34. So I hope this article will encourage more people to get involved and join us on gitlab and on the PipeWire IRC channel at #pipewire on Freenode.

As we are trying to stabilize PipeWire we are working on it on a bug by bug basis atm, so if you end up testing out the current state of PipeWire then be sure to report issues back to us through the PipeWire issue tracker, but do try to ensure you have a good test case/reproducer as we are still so early in the development process that we can’t dig into ‘obscure/unreproducible’ bugs.

Also if you want/need to go back to PulseAudio you can run the commands here

Also if you just want to test a single application and not switch your whole system over you should be able to do that by using the following commands:

pw-pulse

or

pw-jack

Next Steps
So what are our exact development plans at this point? Well here is a list in somewhat priority order:

  1. Stabilize – Our top priority now is to make PipeWire so stable that the power users that we hope to attract us our first batch of users are comfortable running PipeWire as their only audio server. This is critical to build up a userbase that can help us identify and prioritize remaining issues and ensure that when we do switch Fedora Workstation over to using PipeWire as the default and only supported audio server it will be a great experience for users.
  2. Jackdbus – We want to implement support for the jackdbus API soon as we know its an important feature for the Fedora Jam folks. So we hope to get to this in the not to distant future
  3. Flatpak portal for JACK/audio applications – The future of application packaging is Flatpaks and being able to sandbox Jack applications properly inside a Flatpak is something we want to enable.
  4. Bluetooth – Bluetooth has been supported in PipeWire from the start, but as Wims focus has moved elsewhere it has gone a little stale. So we are looking at cycling back to it and cleaning it up to get it production ready. This includes proper support for things like LDAC and AAC passthrough, which is currently not handled in PulseAudio. Wim hopes to push an updated PipeWire in Fedora out next week which should at least get Bluetooth into a basic working state, but the big fix will come later.
  5. Pulse effects – Wim has looked at this, but there are some bugs that blocks data from moving through the pipeline.
  6. Latency compensation – We want complete latency compensation implemented. This is not actually in Jack currently, so it would be a net new feature.
  7. Network audio – PulseAudio style network audio is not implemented yet.

Vivek R: cvtracker: OpenCV object tracking plugin

$
0
0

I’ve been selected as a student developer at Pitivi for Google Summer of Code 2020. My project is to create an object tracking and blurring feature.

The tracking is done by passing the video clip through a pipeline which includes a tracker plugin. So, the first goal of the project was to implement the tracker plugin in GStreamer.

Introducing cvtracker

This is a GStreamer plugin which allows the user to select an object in the initial frame of a clip by specifying the object’s bounding box (x, y, width and height coordinates). The element then tracks the object during the subsequent frames of the clip.

This plugin is in the gst-plugins-bad module. It is currently a merge request.

The plugin can be used by anyone by just installing the module. An example pipeline is given below.

Example

A sample pipeline with cvtracker looks like this:

gst-launch-1.0 filesrc location=t.mp4 ! decodebin ! videoconvert ! cvtracker object-initial-x=175 object-initial-y=40 object-initial-width=300 object-initial-height=150 algorithm=1 ! videoconvert ! xvimagesink

Here’s a demo of the pipeline given above: YouTube

Algorithm

The tracker incorporates OpenCV’s long term tracker cv::Tracker.

The available tracking algorithms are:

Boosting         - the Boosting tracker
CSRT             - the CSRT tracker
KCF              - the KCF (Kernelized Correlation Filter) tracker
MedianFlow       - the Median Flow tracker
MIL              - the MIL tracker
MOSSE            - the MOSSE (Minimum Output Sum of Squared Error) tracker
TLD              - the TLD (Tracking, learning and detection) tracker

You might wonder why we missed the GOTURN algorithm. It was skipped due to the added complexity of setting up the models by the user.

Properties

algorithm                   - the tracking algorithm to use
draw-rect                   - to draw a rectangle around the tracked object
object-initial-x            - object’s initial x coordinate
object-initial-x            - object’s initial y coordinate
object-initial-height       - object’s initial height
object-initial-width        - object’s initial width

The element sends out the tracked object’s bounding box’s x, y, width and height coordinates through the pipeline bus and also through the buffer. If you want live tracking during the playback, you could use the draw-rect property.


Víctor Jáquez: Review of Igalia Multimedia activities (2020/H1)

$
0
0

This blog post is a review of the various activities the Igalia Multimedia team was involved in during the first half of 2020.

Our previous reports are:

Just before a new virus turned into pandemics we could enjoy our traditional FOSDEM. There, our colleague Phil gave a talk about many of the topics covered in this report.

GstWPE

GstWPE’s wpesrc element, produces a video texture representing a web page rendered off-screen by WPE.

We have worked on a new iteration of the GstWPE demo, focusing on one-to-many, web-augmented overlays, broadcasting with WebRTC and Janus.

Also, since the merge of gstwpe plugin in gst-plugins-bad (staging area for new elements) new users have come along spotting rough areas and improving the element along the way.

Video Editing

GStreamer Editing Services (GES) is a library that simplifies the creation of multimedia editing applications. It is based on the GStreamer multimedia framework and is heavily used by Pitivi video editor.

Implemented frame accuracy in the GStreamer Editing Services (GES)

As required by the industry, it is now possible to reference all time in frame number, providing a precise mapping between frame number and play time. Many issues were fixed in GStreamer to reach the precision enough for make this work. Also intensive regression tests were added.

Implemented time effects support in GES

Important refactoring inside GStreamer Editing Services have happened to allow cleanly and safely change playback speed of individual clips.

Implemented reverse playback in GES

Several issues have been fixed inside GStreamer core elements and base classes in order to support reverse playback. This allows us to implement reliable and frame accurate reverse playback for individual clips.

Implemented ImageSequence support in GStreamer and GES

Since OpenTimelineIO implemented ImageSequence support, many users in the community had said it was really required. We reviewed and finished up imagesequencesrc element, which had been awaiting review for years.

This feature is now also supported in the OpentimelineIO GES adapater.

Optimized nested timelines preroll time by an order of magnitude

Caps negotiation, done while the pipeline transitions from pause state to playing state, testing the whole pipeline functionality, was the bottleneck for nested timelines, so pipelines were reworked to avoid useless negotiations. At the same time, other members of GStreamer community have improved caps negotiation performance in general.

Last but not least, our colleague Thibault gave a talk in The Pipeline Conference about The Motion Picture Industry and Open Source Software: GStreamer as an Alternative, explaining how and why GStreamer could be leveraged in the motion picture industry to allow faster innovation, and solve issues by reusing all the multi-platform infrastructure the community has to offer.

WebKit multimedia

There has been a lot of work on WebKit multimedia, particularly for WebKitGTK and WPE ports which use GStreamer framework as backend.

WebKit Flatpak SDK

But first of all we would like to draw readers attention to the new WebKit Flatpak SDK. It was not a contribution only from the multimedia team, but rather a joint effort among different teams in Igalia.

Before WebKit Flatpak SDK, JHBuild was used for setting up a WebKitGTK/WPE environment for testing and development. Its purpose to is to provide a common set of well defined dependencies instead of relying on the ones available in the different Linux distributions, which might bring different outputs. Nonetheless, Flatpak offers a much more coherent environment for testing and develop, isolated from the rest of the building host, approaching to reproducible outputs.

Another great advantage of WebKit Flatpak SDK, at least for the multimedia team, is the possibility of use gst-build to setup a custom GStreamer environment, with latest master, for example.

Now, for sake of brevity, let us sketch an non-complete list of activities and achievements related with WebKit multimedia.

General multimedia

Media Source Extensions (MSE)

Encrypted Media Extension (EME)

One of the major results of this first half, is the upstream of ThunderCDM, which is an implementation of a Content Decryption Module, providing Widevine decryption support. Recently, our colleague Xabier, published a blog post on this regard.

And it has enabled client-side video rendering support, which ensures video frames remain protected in GPU memory so they can’t be reached by third-party. This is a requirement for DRM/EME.

WebRTC

GStreamer

Though we normally contribute in GStreamer with the activities listed above, there are other tasks not related with WebKit. Among these we can enumerate the following:

GStreamer VAAPI

  • Reviewed a lot of patches.
  • Support for media-driver (iHD), the new VAAPI driver for Intel, mostly for Gen9 onwards. There are a lot of features with this driver.
  • A new vaapioverlay element.
  • Deep code cleanups. Among these we would like to mention:
    • Added quirk mechanism for different backends.
    • Change base classes to GstObject and GstMiniObject of most of classes and buffers types.
  • Enhanced caps negotiation given current driver’s constraints

Conclusions

The multimedia team in Igalia has keep working, along the first half of this strange year, in our three main areas: browsers (mainly on WebKitGTK and WPE), video editing and GStreamer framework.

We worked adding and enhancing WebKitGTK and WPE multimedia features in order to offer a solid platform for media providers.

We have enhanced the Video Editing support in GStreamer.

And, along these tasks, we have contribuited as much in GStreamer framework, particulary in hardware accelerated decoding and encoding and VA-API.

GStreamer: GStreamer 1.18.0 new major stable release

$
0
0

The GStreamer team is excited to announce a new major feature release of your favourite cross-platform multimedia framework!

As always, this release is again packed with new features, bug fixes and other improvements.

The 1.18 release series adds new features on top of the previous 1.16 series and is part of the API and ABI-stable 1.x release series of the GStreamer multimedia framework.

Highlights:

  • GstTranscoder: new high level API for applications to transcode media files from one format to another
  • High Dynamic Range (HDR) video information representation and signalling enhancements
  • Instant playback rate change support
  • Active Format Description (AFD) and Bar Data support
  • ONVIF trick modes support in both GStreamer RTSP server and client
  • Hardware-accelerated video decoding on Windows via DXVA2 / Direct3D11
  • Microsoft Media Foundation plugin for video capture and hardware-accelerated video encoding on Windows
  • qmlgloverlay: New overlay element that renders a QtQuick scene over the top of an input video stream
  • New imagesequencesrc element to easily create a video stream from a sequence of jpeg or png images
  • dashsink: Add new sink to produce DASH content
  • dvbsubenc: DVB Subtitle encoder element
  • TV broadcast compliant MPEG-TS muxing with constant bitrate muxing and SCTE-35 support
  • rtmp2: new RTMP client source and sink element implementation
  • svthevcenc: new [SVT-HEVC](https://github.com/OpenVisualCloud/SVT-HEVC)-based H.265 video encoder
  • vaapioverlay compositor element using VA-API
  • rtpmanager support for Google's Transport-Wide Congestion Control (twcc) RTP extension
  • splitmuxsink and splitmuxsrc gained support for auxiliary video streams
  • webrtcbin now contains some initial support for renegotiation involving stream addition and removal
  • New RTP source and sink elements to set up RTP streaming via rtp:// URIs
  • New Audio Video Transport Protocol (AVTP) plugin for Time-Sensitive Applications
  • Support for the Video Services Forum's Reliable Internet Stream Transport (RIST) TR-06-1 Simple Profile
  • Universal Windows Platform (UWP) support
  • rpicamsrc element for capturing from the Raspberry Pi camera
  • RTSP Server TCP interleaved backpressure handling improvements as well as support for Scale/Speed headers
  • GStreamer Editing Services gained support for nested timelines, per-clip speed rate control and the [OpenTimelineIO](https://opentimelineio.readthedocs.io) format.
  • Autotools build system has been removed in favour of Meson
  • Many performance improvements

Full release notes can be found here.

Binaries for Android, iOS, Mac OS X and Windows will be provided in due course.

You can download release tarballs directly here: gstreamer, gst-plugins-base, gst-plugins-good, gst-plugins-ugly, gst-plugins-bad, gst-libav, gst-rtsp-server, gst-python, gst-editing-services, gst-devtools, gstreamer-vaapi, gstreamer-sharp, gst-omx, or gstreamer-docs.

Bastien Nocera: Videos in GNOME 3.38

$
0
0

This is going to be a short post, as changes to Videos have been few and far between in the past couple of releases.

The major change to the latest release is that we've gained Tracker 3 support through a grilo plugin (which meant very few changes to our own code). But the Tracker 3 libraries are incompatible with the Tracker 2 daemon that's usually shipped in distributions, including on this author's development system.

So we made use of the ability of Tracker to run inside a Flatpak sandbox along with the video player, removing the need to have Tracker installed by the distribution, on the host. This should also make it easier to give users control of the directories they want to use to store their movies, in the future.

The release candidate for GNOME 3.38 is available right now as the stable version on Flathub.

Bastien Nocera: Avoid “Tag: v-3.38.0-fixed-brown-paper-bag”

$
0
0

Over the past couple of (gasp!) decades, I've had my fair share of release blunders: forgetting to clean the tree before making a tarball by hand, forgetting to update the NEWS file, forgetting to push after creating the tarball locally, forgetting to update the appdata file (causing problems on Flathub)...

That's where check-news.sh comes in, to replace the check-news function of the autotools. Ideally you would:

- make sure your CI runs a dist job

- always use a merge request to do releases

- integrate check-news.sh to your meson build (though I would relax the appdata checks for devel releases)

Bastien Nocera: power-profiles-daemon: new project announcement

$
0
0

Despite what this might look like, I don't actually enjoy starting new projects: it's a lot easier to clean up some build warnings, or add a CI, than it is to start from an empty directory.

But sometimes needs must, and I've just released version 0.1 of such a project. Below you'll find an excerpt from the README, which should answer most of the questions. Please read the README directly in the repository if you're getting to this blog post more than a couple of days after it was first published.

Feel free to file new issues in the tracker if you have ideas on possible power-saving or performance enhancements. Currently the only supported “Performance” mode supported will interact with Intel CPUs with P-State support. More hardware support is planned.

TLDR; this setting in the GNOME 3.40 development branch soon, Fedora packages are done, API docs available:


From the README:

Introduction

power-profiles-daemon offers to modify system behaviour based upon user-selected power profiles. There are 3 different power profiles, a "balanced" default mode, a "power-saver" mode, as well as a "performance" mode. The first 2 of those are available on every system. The "performance" mode is only available on select systems and is implemented by different "drivers" based on the system or systems it targets.

In addition to those 2 or 3 modes (depending on the system), "actions" can be hooked up to change the behaviour of a particular device. For example, this can be used to disable the fast-charging for some USB devices when in power-saver mode.

GNOME's Settings and shell both include interfaces to select the current mode, but they are also expected to adjust the behaviour of the desktop depending on the mode, such as turning the screen off after inaction more aggressively when in power-saver mode.

Note that power-profiles-daemon does not save the currently active profile across system restarts and will always start with the "balanced" profile selected.

Why power-profiles-daemon

The power-profiles-daemon project was created to help provide a solution for two separate use cases, for desktops, laptops, and other devices running a “traditional Linux desktop”.

The first one is a "Low Power" mode, that users could toggle themselves, or have the system toggle for them, with the intent to save battery. Mobile devices running iOS and Android have had a similar feature available to end-users and application developers alike.

The second use case was to allow a "Performance" mode on systems where the hardware maker would provide and design such a mode. The idea is that the Linux kernel would provide a way to access this mode which usually only exists as a configuration option in some machines' "UEFI Setup" screen.

This second use case is the reason why we didn't implement the "Low Power" mode in UPower, as was originally discussed.

As the daemon would change kernel settings, we would need to run it as root, and make its API available over D-Bus, as has been customary for more than 10 years. We would also design that API to be as easily usable to build graphical interfaces as possible.

Why not...

This section will contain explanations of why this new daemon was written rather than re-using, or modifying an existing one. Each project obviously has its own goals and needs, and those comparisons are not meant as a slight on the project.

As the code bases for both those projects listed and power-profiles-daemon are ever evolving, the comments were understood to be correct when made.

thermald

thermald only works on Intel CPUs, and is very focused on allowing maximum performance based on a "maximum temperature" for the system. As such, it could be seen as complementary to power-profiles-daemon.

tuned and TLP

Both projects have similar goals, allowing for tweaks to be applied, for a variety of workloads that goes far beyond the workloads and use cases that power-profiles-daemon targets.

A fair number of the tweaks that could apply to devices running GNOME or another free desktop are either potentially destructive (eg. some of the SATA power-saving mode resulting in corrupted data), or working well enough to be put into place by default (eg. audio codec power-saving), even if we need to disable the power saving on some hardware that reacts badly to it.

Both are good projects to use for the purpose of experimenting with particular settings to see if they'd be something that can be implemented by default, or to put some fine-grained, static, policies in place on server-type workloads which are not as fluid and changing as desktop workloads can be.

auto-cpufreq

It doesn't take user-intent into account, doesn't have a D-Bus interface and seems to want to work automatically by monitoring the CPU usage, which kind of goes against a user's wishes as a user might still want to conserve as much energy as possible under high-CPU usage.

Viewing all 1078 articles
Browse latest View live