Quantcast
Channel: Planet GStreamer
Viewing all 1078 articles
Browse latest View live

Christian Schaller: GNOME is not the default for Fedora Workstation

$
0
0

We recently had a Fedora AMA where one of the questions asked is why GNOME is the default desktop for Fedora Workstation. In the AMA we answered why GNOME had been chosen for Fedora Workstation, but we didn’t challenge the underlying assumption built into the way the question was asked, and the answer to that assumption is that it isn’t the default. What I mean with this is that Fedora Workstation isn’t a box of parts, where you have default options that can be replaced, its a carefully procured and assembled operating system aimed at developers, sysadmins and makers in general. If you replace one or more parts of it, then it stops being Fedora Workstation and starts being ‘build your own operating system OS’. There is nothing wrong with wanting to or finding it interesting to build your own operating systems, I think a lot of us initially got into Linux due to enjoying doing that. And the Fedora project provides a lot of great infrastructure for people who want to themselves or through teaming up with others build their own operating systems, which is why Fedora has so many spins and variants available.
The Fedora Workstation project is something we made using those tools and it has been tested and developed as an integrated whole, not as a collection of interchangeable components. The Fedora Workstation project might of course over time replace certain parts with other parts over time, like how we are migrating from X.org to Wayland. But at some point we are going to drop standalone X.org support and only support X applications through XWayland. But that is not the same as if each of our users individually did the same. And while it might be technically possible for a skilled users to still get things moved back onto X for some time after we make the formal deprecation, the fact is that you would no longer be using ‘Fedora Workstation’. You be using a homebrew OS that contains parts taken from Fedora Workstation.

So why am I making this distinction? To be crystal clear, it is not to hate on you for wanting to assemble your own OS, in fact we love having anyone with that passion as part of the Fedora community. I would of course love for you to share our vision and join the Fedora Workstation effort, but the same is true for all the other spins and variant communities we have within the Fedora community too. No the reason is that we have a very specific goal of creating a stable and well working experience for our users with Fedora Workstation and one of the ways we achieve this is by having a tightly integrated operating system that we test and develop as a whole. Because that is the operating system we as the Fedora Workstation project want to make. We believe that doing anything else creates an impossible QA matrix, because if you tell people that ‘hey, any part of this OS is replaceable and should still work’ you have essentially created a testing matrix for yourself of infinite size. And while as software engineers I am sure many of us find experiments like ‘wonder if I can get Fedora Workstation running on a BSD kernel’ or ‘I wonder if I can make it work if I replace glibc with Bionic‘ fun and interesting, I am equally sure we all also realize what once we do that we are in self support territory and that Fedora Workstation or any other OS you use as your starting point can’t not be blamed if your system stops working very well. And replacing such a core thing as the desktop is no different to those other examples.

Having been in the game of trying to provide a high quality desktop experience both commercially in the form of RHEL Workstation and through our community efforts around Fedora Workstation I have seen and experienced first hand the problems that the mindset of interchangeable desktop creates. For instance before we switched to the Fedora Workstation branding and it was all just ‘Fedora’ I experienced reviewers complaining about missing features, features had actually spent serious effort implementing, because the reviewer decided to review a different spin of Fedora than the GNOME one. Other cases I remember are of customers trying to fix a problem by switching desktops, only to discover that while the initial issue they wanted fix got resolved by the switch they now got a new batch of issues that was equally problematic for them. And we where left trying to figure out if we should try to fix the original problem, the new ones or maybe the problems reported by users of a third desktop option. We also have had cases of users who just like the reviewer mentioned earlier, assumed something was broken or missing because they where using a different desktop than the one where the feature was added. And at the same time trying to add every feature everywhere would dilute our limited development resources so much that it made us move slow and not have the resources to focus on getting ready for major changes in the hardware landscape for instance.
So for RHEL we now only offer GNOME as the desktop and the same is true in Fedora Workstation, and that is not because we don’t understand that people enjoy experimenting with other desktops, but because it allows us to work with our customers and users and hardware partners on fixing the issues they have with our operating system, because it is a clearly defined entity, and adding the features they need going forward and properly support the hardware they are using, as opposed to spreading ourselves to thin that we just run around putting on band-aids for the problems reported.
And in the longer run I actually believe this approach benefits those of you who want to build your own OS to, or use an OS built by another team around a different set of technologies, because while the improvements might come in a bit later for you, the work we now have the ability to undertake due to having a clear focus, like our work on adding HiDPI support, getting Wayland ready for desktop use or enabling Thunderbolt support in Linux, makes it a lot easier for these other projects to eventually add support for these things too.


Sebastian Pölsterl: Survival Analysis for Deep Learning Tutorial for TensorFlow 2

$
0
0

A while back, I posted the Survival Analysis for Deep Learning tutorial. This tutorial was written for TensorFlow 1 using the tf.estimators API. The changes between version 1 and the current TensorFlow 2 are quite significant, which is why the code does not run when using a recent TensorFlow version. Therefore, I created a new version of the tutorial that is compatible with TensorFlow 2. The text is basically identical, but the training and evaluation procedure changed.

The complete notebook is available on GitHub, or you can run it directly using Google Colaboratory.

Notes on porting to TensorFlow 2

A nice feature of TensorFlow 2 is that in order to write custom metrics (such as concordance index) for TensorBoard, you don’t need to create a Summary protocol buffer manually, instead it suffices to call tf.summary.scalar and pass it a name and float. So instead of

from sksurv.metrics import concordance_index_censored
from tensorflow.core.framework import summary_pb2
c_index_metric = concordance_index_censored(…)[0]
writer = tf.summary.FileWriterCache.get(output_dir)
buf = summary_pb2.Summary(value=[summary_pb2.Summary.Value(
tag="c-index", simple_value=c_index_metric)])
writer.add_summary(buf, global_step=global_step)

you can just do

from sksurv.metrics import concordance_index_censored
with tf.summary.create_file_writer(output_dir):
c_index_metric = concordance_index_censored(…)[0]
summary.scalar("c-index", c_index_metric, step=step)

Another feature that I liked is that you can now iterate over an instance of tf.data.Dataset and directly access the tensors and their values. This is much more convenient than having to call make_one_shot_iterator first, which gives you an iterator, which you call get_next() on to get actual tensors.

Unfortunately, I also encountered some negatives when moving to TensorFlow 2. First of all, there’s currently no officially supported way to produce a view of the executed Graph that is identical to what you get with TensorFlow 1, unless you use the Keras training loop with the TensorBoard callback. There’s tf.summary.trace_export, which as described in this guide sounds like it would produce the graph, however, using this approach you can only view individual operations in TensorBoard, but you can’t inspect what’s the size of input and output tensors of an operation. After searching for while, I eventually found the answer in an Stack overflow post, and, as it turns out, that is exactly what the TensorBoard callback is doing.

Another thing I found odd is that if you define your custom loss as a subclass of tf.keras.losses.Loss, it insists that there are only two inputs y_true and y_pred. In the case of Cox’s proportional hazards loss the true label comprises an event indicator and an indicator matrix specifying which pairs in a batch are comparable. Luckily, the contents of y_pred don’t get checked, so you can just pass a list, but I would prefer to write something like

loss_fn(y_true_event=y_event, y_true_riskset=y_riskset, y_pred=pred_risk_score)

instead of

loss_fn(y_true=[y_event, y_riskset], y_pred=pred_risk_score)

Finally, although eager execution is now enabled by default, the code runs significantly faster in graph mode, i.e. annotating your model’s call method with @tf.function. I guess you are only supposed to use eager execution for debugging purposes.

Seungha Yang: Unfortunately GStreamer 1.17

$
0
0

Unfortunately GStreamer 1.17 is a development version and any binary/installer is not officially released. But you can build it using Cerbero which is a project for packaging GStreamer framework, or simpler way is that you might be able to try gst-build, that’s a meta-project to build GStreamer mostly used for development purpose.

Christian Schaller: Into the world of Robo vacums and Robo mops

$
0
0

So this is a blog post not related to Fedora or Red Hat, but rather my personal experience with getting a robo vacuum and robo mop into the house.

So about two Months ago my wife and I decided to get a Robo vacuum while shopping at Costco (a US wholesaler outfit). So we brought home the iRobot Roomba 980. Over the next week we ended up also getting the newer iRobot Roomba i7+ and the iRobot Braava m6 mopping robot. Our dream was that we would never have to vacuum or mop again, instead leaving that to our new robots to handle. With two little kids being able to cut that work from our todo list seemed like a dream come through.

I feel that whenever you get into a new technology it takes some time with your first product in that category to understand what questions to ask and what considerations to make. For instance I feel a lot of more informed and confident in my knowledge about electric cars having owned a Nissan Leaf for a few years now (enough to wish I had a Tesla instead for instance :). I guess our experience with robot vacuums here is similar.

Anyway, if you are considering buying a Robot vacuum or mop I think the first lesson we learned is that it is definitely not a magic solution. You have to prepare your house quite a bit before each run, including obvious things like tidying up anything on the floor like the kids legos etc., to discovering that certain furniture, like the IKEA Poang chairs are mortal enemies with your robo vacuum. We had to put our chair on top of the sofa as the Roomba would get stuck on it every time we tried to vacuum the floor. Also the door mat in front of our entrance door kept having its corners sucked into the vacuum getting it stuck. Anyway, our lesson learned is that vacuuming (or mopping) is not something we can do on an impulse or easily on a schedule, as it takes quite a bit of preparation. If you don’t have small kid leaving random stuff all over the house all the time you might be able to just set the vacuum on a schedule, but for us that has turned out to be a big no :). So in practice we only vacuum at night now when my wife and I have had time to prep the house after the kids have gone to bed.

It is worth nothing that we only got one vacuum now. We got the i7+ after we got the 980 due to realizing that the 980 didn’t have features like the smart map allowing you to for instance vacuum specific rooms. It also had other niceties like self emptying and it was supposed to be more quiet (which is nice when you run it at night). However in our experience it also had a less strong vacuum, so we felt it left more crap on the floor then the older 980 model. So in the end we returned the i7+ in favour of the 980, just because we felt it did a better job at vacuuming. It is quite loud though, so we can hear it very loud and clear up on the second floor while trying to fall asleep. So if you need a quiet house to sleep, this setup is not for you.

Another lesson we learned is that the vacuums or mops do not work great in darkness, so we now have to leave the light on downstairs at night when we want to vacuum or mop the floor. We should be able to automate that using Google Home, so Google Home could turn on the lights, start the vacuum and then once done, turn off the lights again. We haven’t actually gotten around to test that yet though.

As for the mop, I would say that it is not a replacement for mopping yourself, but it can reduce the frequency of you mopping yourself and thus help maintain a nice clear floor for longer after you done a full manual mop yourself. Also the m6 is super sensitive to edges, which I assume is to avoid it trying to mop your rugs and mats, but it also means that it can not traverse even small thresholds. So for us who have small thresholds between our kitchen area and the rest of the house we have to carry the mop over the thresholds and mop the rest of the first floor as a separate action, which is a bit of an annoyance now that we are running these things at night. That said the kitchen is the one room which needs moping more regularly, so in some sense the current setup where the roomba vacuums the whole first floor and the braava mop mops just the kitchen is a workable solution for us. One nice feature here is that they can be set up to run in order, so the mop will only start once the vacuum is done (that feature is the main reason we haven’t tested out other brand mops which might handle the threshold situation better).

So to conclude, would I recommend robot vacuums and robot mops to other parents with you kids? I would say yes, it has definitely helped us keep the house cleaner and nicer and let us spend less time cleaning the house. But it is not a miracle cure in any way or form, it still takes time and effort to prepare and set up the house and sometimes you still need to do especially the mopping yourself to get things really clean. As for the question of iRobot versus other brands I have no input as I haven’t really tested any other brands. iRobot is a local company so their vacuums are available in a lot of stores around me and I drive by their HQ on a regular basis, so that is the more or less random reason I ended up with their products as opposed to competing ones.

Andy Wingo: a baseline compiler for guile

$
0
0

Greets, my peeps! Today's article is on a new compiler for Guile. I made things better by making things worse!

The new compiler is a "baseline compiler", in the spirit of what modern web browsers use to get things running quickly. It is a very simple compiler whose goal is speed of compilation, not speed of generated code.

Honestly I didn't think Guile needed such a thing. Guile's distribution model isn't like the web, where every page you visit requires the browser to compile fresh hot mess; in Guile I thought it would be reasonable for someone to compile once and run many times. I was never happy with compile latency but I thought it was inevitable and anyway amortized over time. Turns out I was wrong on both points!

The straw that broke the camel's back was Guix, which defines the graph of all installable packages in an operating system using Scheme code. Lately it has been apparent that when you update the set of available packages via a "guix pull", Guix would spend too much time compiling the Scheme modules that contain the package graph.

The funny thing is that it's not important that the package definitions be optimized; they just need to be compiled in a basic way so that they are quick to load. This is the essential use-case for a baseline compiler: instead of trying to make an optimizing compiler go fast by turning off all the optimizations, just write a different compiler that goes from a high-level intermediate representation straight to code.

So that's what I did!

it don't do much

The baseline compiler skips any kind of flow analysis: there's no closure optimization, no contification, no unboxing of tagged numbers, no type inference, no control-flow optimizations, and so on. The only whole-program analysis that is done is a basic free-variables analysis so that closures can capture variables, as well as assignment conversion. Otherwise the baseline compiler just does a traversal over programs as terms of a simple tree intermediate language, emitting bytecode as it goes.

Interestingly the quality of the code produced at optimization level -O0 is pretty much the same.

This graph shows generated code performance of the CPS compiler relative to new baseline compiler, at optimization level 0. Bars below the line mean the CPS compiler produces slower code. Bars above mean CPS makes faster code. You can click and zoom in for details. Note that the Y axis is logarithmic.

The tests in which -O0 CPS wins are mostly because the CPS-based compiler does a robust closure optimization pass that reduces allocation rate.

At optimization level -O1, which adds partial evaluation over the high-level tree intermediate language and support for inlining "primitive calls" like + and so on, I am not sure why CPS peels out in the lead. No additional important optimizations are enabled in CPS at that level. That's probably something to look into.

Note that the baseline of this graph is optimization level -O1, with the new baseline compiler.

But as I mentioned, I didn't write the baseline compiler to produce fast code; I wrote it to produce code fast. So does it actually go fast?

Well against the -O0 and -O1 configurations of the CPS compiler, it does excellently:

Here you can see comparisons between what will be Guile 3.0.3's -O0 and -O1, compared against their equivalents in 3.0.2. (In 3.0.2 the -O1 equivalent is actually -O1 -Oresolve-primitives, if you are following along at home.) What you can see is that at these optimization levels, for these 8 files, the baseline compiler is around 4 times as fast.

If we compare to Guile 3.0.3's default -O2 optimization level, or -O3, we see bigger disparities:

Which is to say that Guile's baseline compiler runs at about 10x the speed of its optimizing compiler, which incidentally is similar to what I found for WebAssembly compilers a while back.

Also of note is that -O0 and -O1 take essentially the same time, with -O1 often taking less time than -O0. This is because partial evaluation can make the program smaller, at a cost of being less straightforward to debug.

Similarly, -O3 usually takes less time than -O2. This is because -O3 is allowed to assume top-level bindings that aren't exported from a module can be transformed to lexical bindings, which are more available for contification and inlining, which usually leads to smaller programs; it is a similar debugging/performance tradeoff to the -O0/-O1 case.

But what does one gain when choosing to spend 10 times more on compilation? Here I have a gnarly graph that plots performance on some microbenchmarks for all the different optimization levels.

Like I said, it's gnarly, but the summary is that -O1 typically gets you a factor of 2 or 4 over -O0, and -O2 often gets you another factor of 2 above that. -O3 is mostly the same as -O2 except in magical circumstances like the mbrot case, where it adds an extra 16x or so over -O2.

worse is better

I haven't seen the numbers yet of this new compiler in Guix, but I hope it can have a good impact. Already in Guile itself though I've seen a couple interesting advantages.

One is that because it produces code faster, Guile's boostrap from source can take less time. There is also a felicitous feedback effect in that because the baseline compiler is much smaller than the CPS compiler, it takes less time to macro-expand, which reduces bootstrap time (as bootstrap has to pay the cost of expanding the compiler, until the compiler is compiled).

The second fortunate result is that now I can use the baseline compiler as an oracle for the CPS compiler, when I'm working on new optimizations. There's nothing worse than suspecting that your compiler miscompiled itself, after all, and having a second compiler helps keep me sane.

stay safe, friends

The code, you ask? Voici.

Although this work has been ongoing throughout the past month, I need to add some words on the now before leaving you: there is a kind of cognitive dissonance between nerding out on compilers in the comfort of my home, rain pounding on the patio, and at the same time the world on righteous fire. I hope it is clear to everyone by now that the US police are an essentially racist institution: they harass, maim, and murder Black people at much higher rates than whites. My heart is with the protestors. Godspeed to you all, from afar. At the same time, all my non-Black readers should reflect on the ways they participate in systems that support white supremacy, and on strategies to tear them down. I know I will be. Stay safe, wear eye protection, and until next time: peace.

Phil Normand: Introducing the WebKit Flatpak SDK

$
0
0

Working on a web-engine often requires a complex build infrastructure. This post documents our transition from JHBuild to Flatpak for the WebKitGTK and WPEWebKit development builds.

For the last 10 years, WebKitGTK has been relying on a custom JHBuild moduleset to handle its dependencies and (try to) ensure a reproducable …

Phil Normand: WebKitGTK and WPE now supporting videos in the img tag

$
0
0

Using videos in the <img>HTML tag can lead to more responsive web-page loads in most cases. Colin Bendell blogged about this topic, make sure to read his post on the cloudinary website. As it turns out, this feature has been supported for more than 2 years in Safari, but …

Jean-François Fortin Tam: Revival of GTG, status update #2: git ready to test!

$
0
0

As a follow-up to my first global project situation update, I am happy to report great progress towards the successful revival of the GTG project.

You can see that in this fancy-pants teaser trailer (featuring epic music, big explosions and special effects), or this short status update video that also includes the trailer in it:

We’re getting really, really close. Here are some good recent news:

  1. We are seriously running out of bugsfor what will become the 0.4 release.
    • I have tried pretty hard to break the git version of GTG and Diego has kept fixing issues faster than I could find new bugs 🤔 
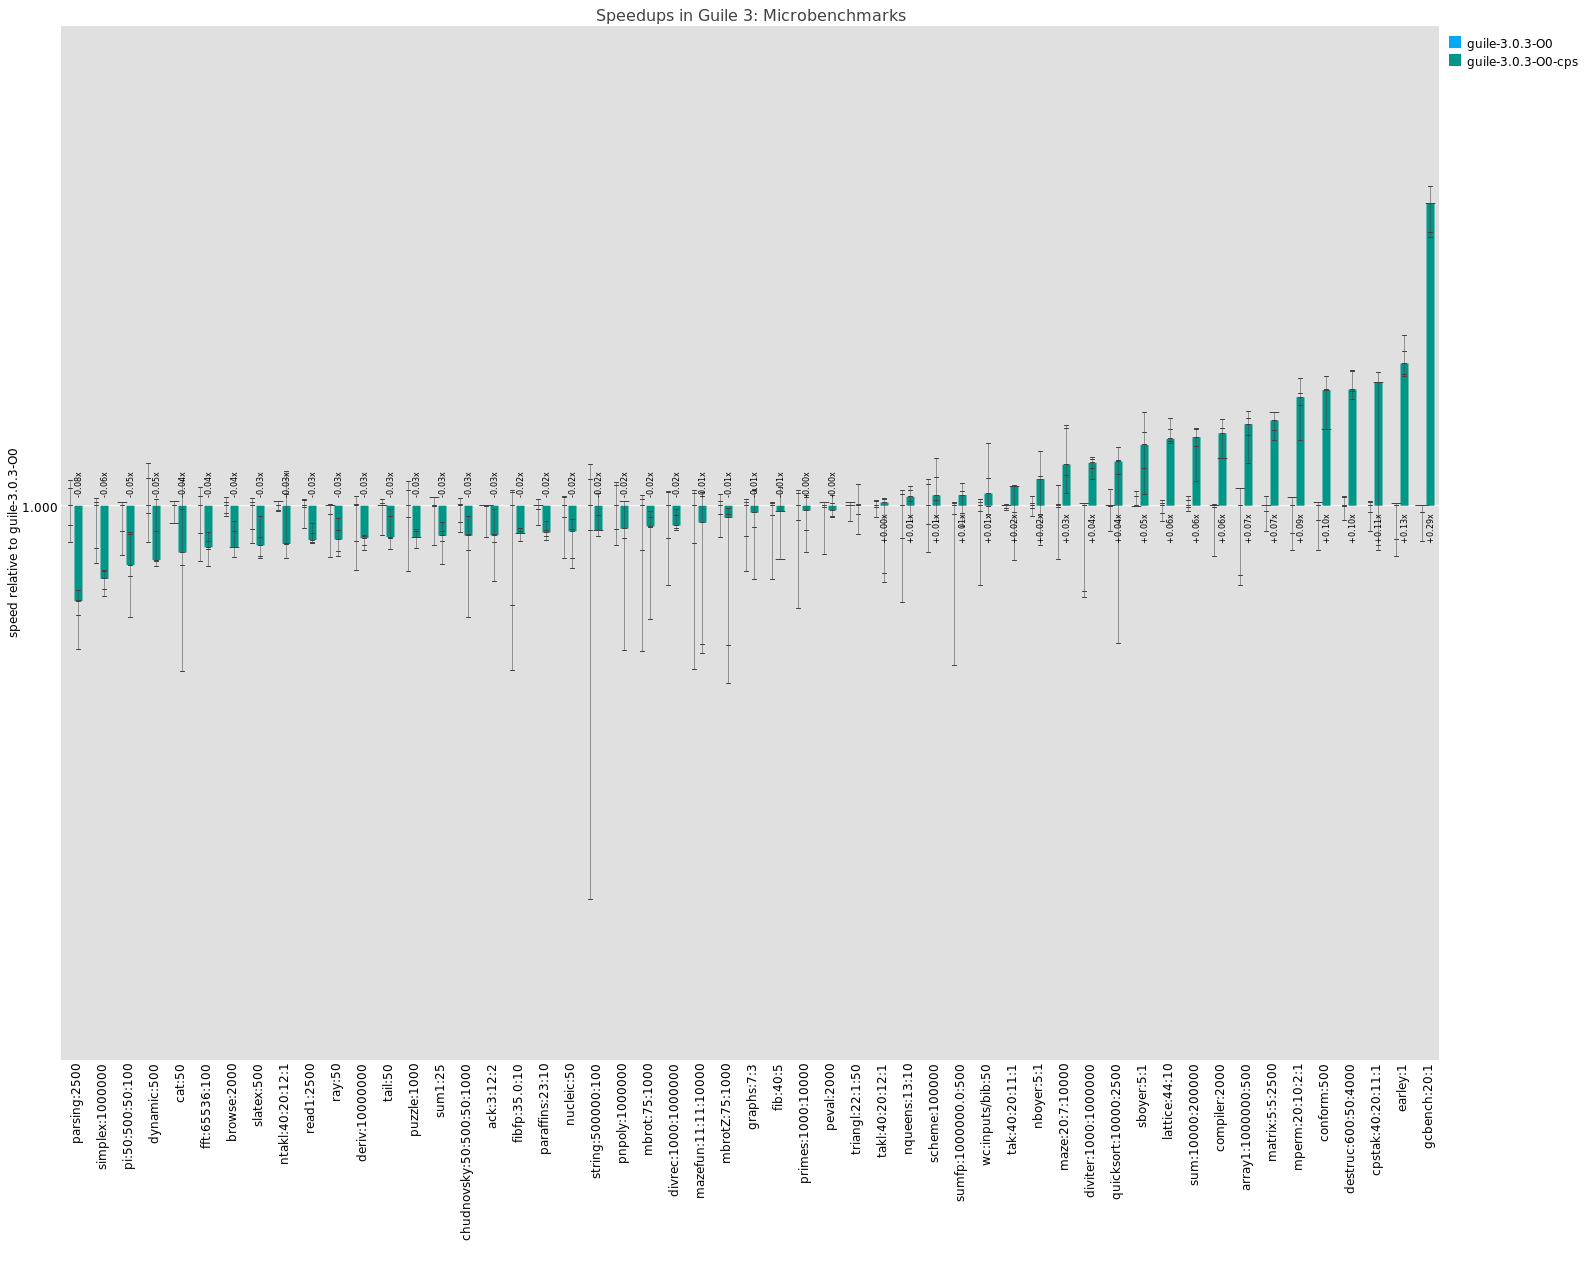
At this point, it seems to be quite robust and safe to use, so I need you to test it like maniacs.
    • The rest of the tickets in the issue tracker are all feature requests or non-critical issues that can wait to future releases (such as performance optimizations).
  2. Recently I have completed the reorganization and rewriting of the contributors documentation for the GTG project. Please take the time (7 to 9 minutes) to read that blog post.
  3. Thanks to Danielle Vansia’s diligent work, the effort to update and reorganize the user manual is well underway. I believe more great work is yet to come on that front. In addition to viewing with with Yelp, you can also read it online here.
  4. Thanks to Mart Raudsepp’s invaluable help, GTG now supports the highly-popular Meson build system.
    • That also means GNOME Builder can now build & run GTG directly.
    • You can still run GTG manually like before with the “launch.sh” script; simply ensure you have the “meson” package installed before doing so.
    • Unlike the previous launch script, this also facilitates translation work now as it automatically compiles the translation files and also supports running the development version with a language environment variable, such as “LANG=fr_CA.UTF8 ./launch.sh“!
  5. I have spent a couple of days (including a 9-10 hours nonstop coding session) reworking the code to harmonize, improve and deduplicate translatable strings, and redo the whole French translation (now with more chocolatine) and bring it to 100% completion as a way to test and ensure everything in the UI that can possibly be translated is, indeed, translated (barring one strange bug). I can assure you, the fact that I did not eat for over 53 hours in a row was a mere coïncidence.
  6. We have a Twitter account and a Mastodon account now. Go nuts.
  7. We are supposed to be migrating from GitHub to GNOME’s GitLab instance eventually. We’ll need help.

In prevision for the upcoming 0.4 release, I have also made a new release of libLarch, 3.0.1. This is a picture of me making that libLarch release:

Call for contributors
(testers, hackers, translators, packagers)

Now is a great time to get involved, whether with code, translations, or pre-packaging.

  • Considering that I’ve run out of bugs to report, I want you to start testing GTG’s git version now, and report bugs in GitHub².
    • See the read-me for tips on how to build and run the Git version, or see the footnotes below regarding our flatpak packages¹)
    • If nobody finds serious issues, then we can assume our code is “perfectly stable” and would be ready to make a release “any day now”… well, I still have to research and write release notes before that happens (wanna help?), however.
  • If you are a GNOME translator, now is your call to review and update your translations if you want to squeeze them in before the release scheduled to happen (which, barring the absence of new showstopper bugs, should happen within weeks at most).
    • Yes, I know this isn’t much of an “advance notice” at all, but we live in special times this cycle;
    • Also yes, I know the project is on GitHub instead of GNOME’s gitlab, but I haven’t got the skills and time to fix that myself. I’ll accept translation files thrown at me by email if that makes it any easier. If you are working on the translation for a particular language, you should let others know through this ticket.
  • If you are a Linux package maintainer who wants to be able to offer GTG 0.4 and libLarch 3.0.1 “from day one” or as an update in your distro, you may want to start preparations for packaging this release, considering that GTG and libLarch no longer depend on Python 2 nor GTK 2…

Adopt a a puppy plugin!

In order to be able to move fast towards 0.4 without being tied to single-handedly fixing “everything”, we’ve had to split the plugins (and data/synchronization backends) into a couple of categories: those that we can easily fix, those that are no longer relevant and those that are broken but “probably interesting to some users, while not mission-critical”. Those that were not trivial to fix have been deactivated (moved to the “unmaintained” subfolder)—at least until someone new (you?) cares enough about a particular feature to come fix and maintain it. Adopt a puppy today!

Alternate “backends” are particularly affected by this, as the only backend we’ve left enabled is the default “local storage” backend.

If you care about GTG integrating with Evolution, GNote or Tomboy (Tomboy-NG?), LaunchPad, Mantis, Bugzilla, Hamster, and Remember the Milk (that one seemed like a pretty popular backend), then please step up to contribute fixes and maintainership for your favorite plugin/backend. Otherwise, it will most likely stay deactivated.

You can see the issues related to plugins/backends here.


Footnotes

  1. All development infrastructure has been moved to GitHub; we will be decommissionning everything in LaunchPad (to the extent that it is possible to just “disable” things?) as soon as 0.4 comes out. We are supposed to be migrating from GitHub to GNOME’s GitLab instance next.
  2. One thing that is expected to be particularly important to release 0.4 to a wider audience is offering Flatpak packages. We’re mostly ready for this (see this ticket) but it might take a few more days before we can figure out how to have the nightly/dev package officially published as a flatpak (on Flathub, for example) before the 0.4 release package.
    If you don’t want to wait for that, and want a temporary flatpak to try the git version “now!!”, you can go in this folder, download the flatpak file that is sitting there and run: flatpak install -y --user gtg-git-2020-06-11.flatpak (for example). To uninstall it when you want to switch to a more official flatpak later on, do: flatpak uninstall --user org.gnome.GTGDevel; and if you have ideas on how to improve that flatpak package, feel free to help out in the ticket mentioned above.

P.s.: You might think grabbing a random package file from some obscure folder listing on a website is a bit reminiscent of Windows, and therefore by now you would inevitably be asking, “So where’s the keygen!?!”, but since there isn’t any, I would instead recommend you listen to the piece of music below to have the whole “install apps obtained from a website mentioned in a random post” experience!

                                   
   mmm        mmmmmmm          mmm 
 m"   "          #           m"   "
 #   mm          #           #   mm
 #    #          #           #    #
  "mmm"          #            "mmm"
                                   
                                   
Packaged by Diego.
Greetz to Bilal and the Flathub Team!!
“Against the Time”, by the ORiON group… Because that’s how software was installed back then.

The post Revival of GTG, status update #2: git ready to test! appeared first on The Open Sourcerer.


Sjoerd Simons: Telepathy and VP8!

$
0
0
htmltidy failed to parse this html

Sjoerd Simons: Is that a tea cosy on your head?

$
0
0
htmltidy failed to parse this html

Sjoerd Simons: Meego Tablet now with cat support

$
0
0
htmltidy failed to parse this html

Sjoerd Simons: Codec bitrate control

$
0
0
htmltidy failed to parse this html

Phil Normand: Setting up Debian containers on Fedora Silverblue

$
0
0

After almost 20 years using Debian, I am trying something different, Fedora Silverblue. However for work I still need to use Debian/Ubuntu from time to time. In this post I am explaining the steps to setup Debian containers on Silverblue.

By default Silverblue comes with Toolbox which perfectly integrates …

Víctor Jáquez: WebKit Flatpak SDK and gst-build

$
0
0

This post is an annex of Phil’s Introducing the WebKit Flatpak SDK. Please make sure to read it, if you haven’t already.

Recapitulating, nowadays WebKitGtk/WPE developers —and their CI infrastructure— are moving towards to Flatpak-based environment for their workflow. This Flatpak-based environment, or Flatpak SDK for short, can be visualized as a software sandboxed-container, which bundles all the dependencies required to compile, run and debug WebKitGtk/WPE.

In a day-by-day work, this approach removes the potential compilation of the world in order to obtain reproducible builds, improving the development and testing work flow.

But what if you are also involved in the development of one dependency?

This is the case of Igalia’s multimedia team where, besides developing the multimedia features for WebKitGtk and WPE, we also participate in the GStreamer development, the framework used for multimedia.

Because of this, in our workflow we usually need to build WebKit with a fix, hack or new feature in GStreamer. Is it possible to add in Flatpak our custom GStreamer build without messing its own GStreamer setup? Yes, it’s possible.

gst-build is a set of scripts in Python which clone GStreamer repositories, compile them and setup an uninstalled environment. This uninstalled environment allows a transient usage of the compiled framework from their build tree, avoiding installation and further mess up with our system.

The WebKit scripts that wraps Flatpak operations are also capable to handle the scripts of gst-build to build GStreamer inside the container, and, when running WebKit’s artifacts, the scripts enable the mentioned uninstalled environment, overloading Flatpak’s GStreamer.

How do we unveil all this magic?

First of all, setup a gst-build installation as it is documented. In this installation is were the GStreamer plumbing is done.

Later, gst-build operations through WebKit compilation scripts are enabled when the environment variable GST_BUILD_PATH is exported. This variable should point to the directory where the gst-build tree is placed.

And that’s all!

But let’s put these words in actual commands. The following workflow assumes that WebKit repository is cloned in ~/WebKit and the gst-build tree is in ~/gst-build (please, excuse my bashisms).

Compiling WebKitGtk with symbols, using LLVM as toolchain (this command will also compile GStreamer):

$ cd ~/WebKit
% CC=clang CXX=clang++ GST_BUILD_PATH=/home/vjaquez/gst-build Tools/Scripts/build-webkit --gtk --debug
...

Running the generated minibrowser (remind GST_BUILD_PATH is required again for a correct linking):

$ GST_BUILD_PATH=/home/vjaquez/gst-build Tools/Scripts/run-minibrowser --gtk --debug
...

Running media layout tests:

$ GST_BUILD_PATH=/home/vjaquez/gst-build ./Tools/Scripts/run-webkit-tests --gtk --debug media

But wait! There’s more...

What if you I want to parametrize the GStreamer compilation. To say, I would like to enable a GStreamer module or disable the built of a specific element.

gst-build, as the rest of GStreamer modules, uses meson build system, so it’s possible to pass arguments to meson through the environment variable GST_BUILD_ARGS.

For example, I would like to enable gstreamer-vaapi 😇

$ cd ~/WebKit
% CC=clang CXX=clang++ GST_BUILD_PATH=/home/vjaquez/gst-build GST_BUILD_ARGS="-Dvaapi=enabled" Tools/Scripts/build-webkit --gtk --debug
...

GStreamer: GStreamer 1.17.1 unstable development release

$
0
0

The GStreamer team is pleased to announce the first development release in the unstable 1.17 release series.

The unstable 1.17 release series adds new features on top of the current stable 1.16 series and is part of the API and ABI-stable 1.x release series of the GStreamer multimedia framework.

The unstable 1.17 release series is for testing and development purposes in the lead-up to the stable 1.16 series which is scheduled for release in a few weeks time. Any newly-added API can still change until that point, although it is rare for that to happen.

Full release notes will be provided in the near future, highlighting all the new features, bugfixes, performance optimizations and other important changes.

The autotools build has been dropped entirely for this release, so it's finally all Meson from here on.

This development release is primarily for distributors and early adaptors and anyone who still needs to update their build/packaging setup for Meson.

On the documentation front we have switched away from gtk-doc to hotdoc, but we now provide a release tarball of the built documentation in html and devhelp format, and we recommend distributors switch to that and provide a single gstreamer documentation package in future.

Instead of a gst-validate tarball we now ship a gst-devtools tarball, and the gstreamer-editing-services tarball has been renamed to gst-editing-services for consistency with the module name in Gitlab.

Packagers: please note that plugins may have moved between modules, so please take extra care and make sure inter-module version dependencies are such that users can only upgrade all modules in one go, instead of seeing a mix of 1.17 and 1.16 on their system.

Binaries for Android, iOS, Mac OS X and Windows are also available at the usual location.

Release tarballs can be downloaded directly here:

As always, please let us know of any issues you run into by filing an issue in Gitlab.


Michael Sheldon: Qt QML Maps – Using the OSM plugin with API keys

$
0
0

For a recent side-project I’ve been working on (a cycle computer for UBPorts phones) I found that when using the QtLocation Map QML element, nearly all the map types provided by the OSM plugin (besides the basic streetmap type) require an API key from Thunderforest. Unfortunately, there doesn’t appear to be a documented way of supplying an API key to the plugin, and the handful of forum posts and Stack Overflow questions on the topic are either unanswered or answered by people believing that it’s not possible. It’s not obvious, but after a bit of digging into the way the OSM plugin works I’ve discovered a mechanism by which an API key can be supplied to tile servers that require one.

When the OSM plugin is initialised it communicates with the Qt providers repository which tells it what URLs to use for each map type. The location of the providers repository can be customised through the osm.mapping.providersrepository.address OSM plugin property, so all we need to do to use our API key is to set up our own providers repository with URLs that include our API key as a parameter. The repository itself is just a collection of JSON files, with specific names (cycle, cycle-hires, hiking, hiking-hires, night-transit, night-transit-hires, satellite, street, street-hires, terrain, terrain-hires, transit, transit-hires) each corresponding to a map type. The *-hires files provide URLs for tiles at twice the normal resolution, for high DPI displays.

For example, this is the cycle file served by the default Qt providers repository:

{
    "UrlTemplate" : "http://a.tile.thunderforest.com/cycle/%z/%x/%y.png",
    "ImageFormat" : "png",
    "QImageFormat" : "Indexed8",
    "ID" : "thf-cycle",
    "MaximumZoomLevel" : 20,
    "MapCopyRight" : "<a href='http://www.thunderforest.com/'>Thunderforest</a>",
    "DataCopyRight" : "<a href='http://www.openstreetmap.org/copyright'>OpenStreetMap</a> contributors"
}

To provide an API key with our tile requests we can simply modify the UrlTemplate:

"UrlTemplate" : "http://a.tile.thunderforest.com/cycle/%z/%x/%y.png?apikey=YOUR_API_KEY",

Automatic repository setup

I’ve created a simple tool for setting up a complete repository using a custom API key here: https://github.com/Elleo/qt-osm-map-providers

  1. First obtain an API key from https://www.thunderforest.com/docs/apikeys/
  2. Next clone my repository: git clone https://github.com/Elleo/qt-osm-map-providers.git
  3. Run: ./set_api_keys.sh your_api_key (replacing your_api_key with the key you obtained in step 1)
  4. Copy the files from this repository to your webserver (e.g. http://www.mywebsite.com/osm_repository)
  5. Set the osm.mapping.providersrepository.address property to point to the location setup in step 4 (see the QML example below)

QML Example

Here’s a quick example QML app that will make use of the custom repository we’ve set up:

import QtQuick 2.7
import QtQuick.Controls 2.5
import QtLocation 5.10

ApplicationWindow {

    title: qsTr("Map Example")
    width: 1280
    height: 720

    Map {
        anchors.fill: parent
        zoomLevel: 14
        plugin: Plugin {
            name: "osm"
            PluginParameter { name: "osm.mapping.providersrepository.address"; value: "http://www.mywebsite.com/osm_repository" }
            PluginParameter { name: "osm.mapping.highdpi_tiles"; value: true }
        }
        activeMapType: supportedMapTypes[1] // Cycle map provided by Thunderforest
    }
    
}

Sebastian Pölsterl: scikit-survival 0.13 Released

$
0
0

Today, I released version 0.13.0 of scikit-survival. Most notably, this release adds sksurv.metrics.brier_score and sksurv.metrics.integrated_brier_score, an updated PEP 517/518 compatible build system, and support for scikit-learn 0.23.

For a full list of changes in scikit-survival 0.13.0, please see the release notes.

Pre-built conda packages are available for Linux, macOS, and Windows via

 conda install -c sebp scikit-survival

Alternatively, scikit-survival can be installed from source following these instructions.

The time-dependent Brier score

The time-dependent Brier score is an extension of the mean squared error to right censored data:

$$ \mathrm{BS}^c(t) = \frac{1}{n} \sum_{i=1}^n I(y_i \leq t \land \delta_i = 1) \frac{(0 - \hat{\pi}(t | \mathbf{x}_i))^2}{\hat{G}(y_i)} + I(y_i > t) \frac{(1 - \hat{\pi}(t | \mathbf{x}_i))^2}{\hat{G}(t)} , $$

where $\hat{\pi}(t | \mathbf{x})$ is a model’s predicted probability of remaining event-free up to time point $t$ for feature vector $\mathbf{x}$, and $1/\hat{G}(t)$ is an inverse probability of censoring weight.

The Brier score is often used to assess calibration. If a model predicts a 10% risk of experiencing an event at time $t$, the observed frequency in the data should match this percentage for a well calibrated model. In addition, the Brier score is also a measure of discrimination: whether a model is able to predict risk scores that allow us to correctly determine the order of events. The concordance index is probably the most common measure of discrimination. However, the concordance index disregards the actual values of predicted risk scores – it is a ranking metric – and is unable to tell us anything about calibration.

Let’s consider an example based on data from the German Breast Cancer Study Group 2.

from sksurv.datasets import load_gbsg2
from sksurv.preprocessing import encode_categorical
from sklearn.model_selection import train_test_split
X, y = load_gbsg2()
X = encode_categorical(X)
X_train, X_test, y_train, y_test = train_test_split(
X, y, stratify=y["cens"], random_state=1)

We want to train a model on the training data and assess its discrimination and calibration on the test data. Here, we consider a Random Survival Forest and Cox’s proportional hazards model with elastic-net penalty.

from sksurv.ensemble import RandomSurvivalForest
from sksurv.linear_model import CoxnetSurvivalAnalysis
rsf = RandomSurvivalForest(max_depth=2, random_state=1)
rsf.fit(X_train, y_train)
cph = CoxnetSurvivalAnalysis(l1_ratio=0.99, fit_baseline_model=True)
cph.fit(X_train, y_train)

First, let’s start with discrimination as measured by the concordance index.

rsf_c = rsf.score(X_test, y_test)
cph_c = cph.score(X_test, y_test)

The result indicates that both models perform equally well, achieving a concordance index of 0.688, which is significantly better than a random model with 0.5 concordance index. Unfortunately, it doesn’t help us to decide which model we should choose. So let’s consider the time-dependent Brier score as an alternative, which asses discrimination and calibration.

We first need to determine for which time points $t$ we want to compute the Brier score for. We are going to use a data-driven approach here by selecting all time points between the 10% and 90% percentile of observed time points.

import numpy as np
lower, upper = np.percentile(y["time"], [10, 90])
times = np.arange(lower, upper + 1)

This returns 1690 time points, for which we need to estimate the probability of survival for, which is given by the survival function. Thus, we iterate over the predicted survival functions on the test data and evaluate each at the time points from above.

rsf_surv_prob = np.row_stack([
fn(times)
for fn in rsf.predict_survival_function(X_test, return_array=False)
])
cph_surv_prob = np.row_stack([
fn(times)
for fn in cph.predict_survival_function(X_test)
])

Note that calling predict_survival_function for RandomSurvivalForest with return_array=False requires scikit-survival 0.13.

In addition, we want to have a baseline to tell us how much better our models are from random. A random model would simply predict 0.5 every time.

random_surv_prob = 0.5 * np.ones((y_test.shape[0], times.shape[0]))

Another useful reference is the Kaplan-Meier estimator, that does not consider any features: it estimates a survival function only from y_test. We replicate this estimate for all samples in the test data.

from sksurv.functions import StepFunction
from sksurv.nonparametric import kaplan_meier_estimator
km_func = StepFunction(*kaplan_meier_estimator(y_test["cens"], y_test["time"]))
km_surv_prob = np.tile(km_func(times), (y_test.shape[0], 1))

Instead of comparing calibration across all 1690 time points, we’ll be using the integrated Brier score (IBS) over all time points, which will give us a single number to compare the models by.

from sksurv.metrics import integrated_brier_score
random_brier = integrated_brier_score(y, y_test, random_surv_prob, times)
km_brier = integrated_brier_score(y, y_test, km_surv_prob, times)
rsf_brier = integrated_brier_score(y, y_test, rsf_surv_prob, times)
cph_brier = integrated_brier_score(y, y_test, cph_surv_prob, times)

The results are summarized in the table below:

RSFCoxnetRandomKaplan-Meier
c-index0.6880.6880.500
IBS0.1940.1880.2470.217

Despite Random Survival Forest and Cox’s proportional hazards model performing equally well in terms of discrimination, there seems to be a notable difference in terms of calibration, with Cox’s proportional hazards model outperforming Random Survival Forest.

As a final note, I want to clarify that the Brier score is only applicable for models that are able to estimate a survival function. Hence, it currently cannot be used with Survival Support Vector Machines.

Phil Normand: Web-augmented graphics overlay broadcasting with WPE and GStreamer

$
0
0

Graphics overlays are everywhere nowadays in the live video broadcasting industry. In this post I introduce a new demo relying on GStreamer and WPEWebKit to deliver low-latency web-augmented video broadcasts.

Readers of this blog might remember a few posts about WPEWebKit and a GStreamer element we at Igalia worked on …

GStreamer: GStreamer 1.17.2 unstable development release

$
0
0

The GStreamer team is pleased to announce the second development release in the unstable 1.17 release series.

The unstable 1.17 release series adds new features on top of the current stable 1.16 series and is part of the API and ABI-stable 1.x release series of the GStreamer multimedia framework.

The unstable 1.17 release series is for testing and development purposes in the lead-up to the stable 1.18 series which is scheduled for release in a few weeks time. Any newly-added API can still change until that point, although it is rare for that to happen.

Full release notes will be provided in the near future, highlighting all the new features, bugfixes, performance optimizations and other important changes.

The autotools build has been dropped entirely for this release, so it's finally all Meson from here on.

This development release is primarily for distributors and early adaptors and anyone who still needs to update their build/packaging setup for Meson.

On the documentation front we have switched away from gtk-doc to hotdoc, but we now provide a release tarball of the built documentation in html and devhelp format, and we recommend distributors switch to that and provide a single gstreamer documentation package in future. Packagers will not need to use hotdoc themselves.

Instead of a gst-validate tarball we now ship a gst-devtools tarball, and the gstreamer-editing-services tarball has been renamed to gst-editing-services for consistency with the module name in Gitlab.

Packagers: please note that plugins may have moved between modules, so please take extra care and make sure inter-module version dependencies are such that users can only upgrade all modules in one go, instead of seeing a mix of 1.17 and 1.16 on their system.

Binaries for Android, iOS, Mac OS X and Windows are also available at the usual location.

Release tarballs can be downloaded directly here:

As always, please let us know of any issues you run into by filing an issue in Gitlab.

GStreamer: GStreamer Rust bindings 0.16.0 release

$
0
0

A new version of the GStreamer Rust bindings, 0.16.0, was released.

As usual this release follows the latest gtk-rs release.

This is the first version that includes optional support for new GStreamer 1.18 APIs. As GStreamer 1.18 was not released yet, these new APIs might still change. The minimum supported version of the bindings is still GStreamer 1.8 and the targetted GStreamer API version can be selected by applications via feature flags.

Apart from this, new version features mostly features API cleanup and the addition of a few missing APIs. The focus of this release was to make usage of GStreamer from Rust as convenient and complete as possible.

The new release also brings a lot of bugfixes, most of which were already part of the 0.15.x bugfix releases.

A new release of the GStreamer Rust plugins will follow in the next days.

Details can be found in the release notes for gstreamer-rs and gstreamer-rs-sys.

The code and documentation for the bindings is available on the freedesktop.org GitLab

as well as on crates.io.

If you find any bugs, notice any missing features or other issues please report them in GitLab.

Viewing all 1078 articles
Browse latest View live